

Let's get right to it: what exactly is a sewing stabilizer?
Think of it as a temporary sidekick for your fabric. It's a special material you add to your project to keep the fabric from stretching, puckering, or shifting around while you're stitching. It provides a stable foundation, almost like a hidden scaffolding, ensuring your stitches come out looking sharp and professional—especially when you're doing detailed work like embroidery or intricate quilting.
The Quilter's Secret Weapon for Perfect Stitches
Have you ever poured your heart into a gorgeous quilt block, only to see the fabric pucker and warp as soon as it goes under the needle? It’s a common frustration, and it's exactly the problem stabilizers were made to solve.
Imagine trying to write on a single, flimsy piece of paper. Your pen would likely tear it or bunch it up. Now, picture placing that paper on a firm clipboard. Suddenly, you have a solid, reliable surface. That clipboard is your stabilizer! It gives your fabric a temporary boost, letting it handle dense stitching and complex patterns without a fight. Whether it’s machine embroidery, delicate appliqué, or free-motion quilting, the stabilizer holds everything taut and prevents the fabric from getting mangled by the machine.
Building a Foundation for Flawless Work
This added stability is absolutely crucial when you're working with quilt batting. A good stabilizer makes sure your quilt top, batting, and backing all move together as a single, unified layer. This teamwork is what prevents drag and ensures every stitch is formed perfectly, protecting the time, effort, and money you’ve invested in beautiful materials.
A great stabilizer does more than just support your fabric—it supports your creativity. It takes the technical headache of puckering and distortion off your plate, freeing you up to focus on the art of your design.
A Booming Industry Built on Support
The proof is in the pudding—and in the numbers. Stabilizers have become non-negotiable for anyone serious about getting professional-looking results, especially when using top-tier batting from brands like Hobbs and Pellon.
The global market for textile stabilizers was valued at an impressive $2.35 billion in 2023 and is on track to hit $5.0 billion by 2035. This isn't just some niche product; it's a cornerstone of the industry. For home quilters and business owners using popular 80/20 cotton-poly blends or 100% cotton with scrim, stabilizers are the key to crisp seams and perfectly flat layers. You can see more details on this growth in the textile stabilizers market report.
Choosing Your Stabilizer: Tear-Away, Cut-Away, and More
Walking into the stabilizer aisle can feel a bit overwhelming at first, like trying to decipher a secret code. But once you get a handle on the main "families" of stabilizers, picking the right one becomes second nature.
Think of it this way: you wouldn't use a tiny screwdriver for a big bolt. In the same way, different stabilizers are specialized tools, each designed for a specific job to make sure your project turns out beautifully.
The most important question to ask yourself is: do I need this support to stick around, or should it disappear when I'm done? Your answer will point you straight to the perfect stabilizer for your fabric and design. Let’s meet the main players.
Tear-Away: The Temporary Guest
Imagine you have a friend who comes over, helps you rearrange all your heavy furniture, and then leaves without a trace. That’s a tear-away stabilizer. It gives your fabric a sturdy, reliable backbone while you're stitching, which is fantastic for stable, non-stretchy materials like your favorite quilting cottons.
Once your embroidery or decorative stitching is finished, you just gently tear the extra stabilizer away from the stitches. It's perfect for things where the back will be hidden, like quilt blocks or in-the-hoop projects. A great all-rounder is the Pellon® 371 Fuse-N-Tear® Stabilizer, which has the bonus of being fusible, making it super easy to position.
Just keep in mind, tiny bits of fiber can sometimes hang around the edges of your stitches, so it’s not always the best choice for clothing where a scratchy backing could irritate the skin.
This simple diagram shows exactly where the stabilizer fits in—it’s the crucial support system between your fabric and a perfect stitch.
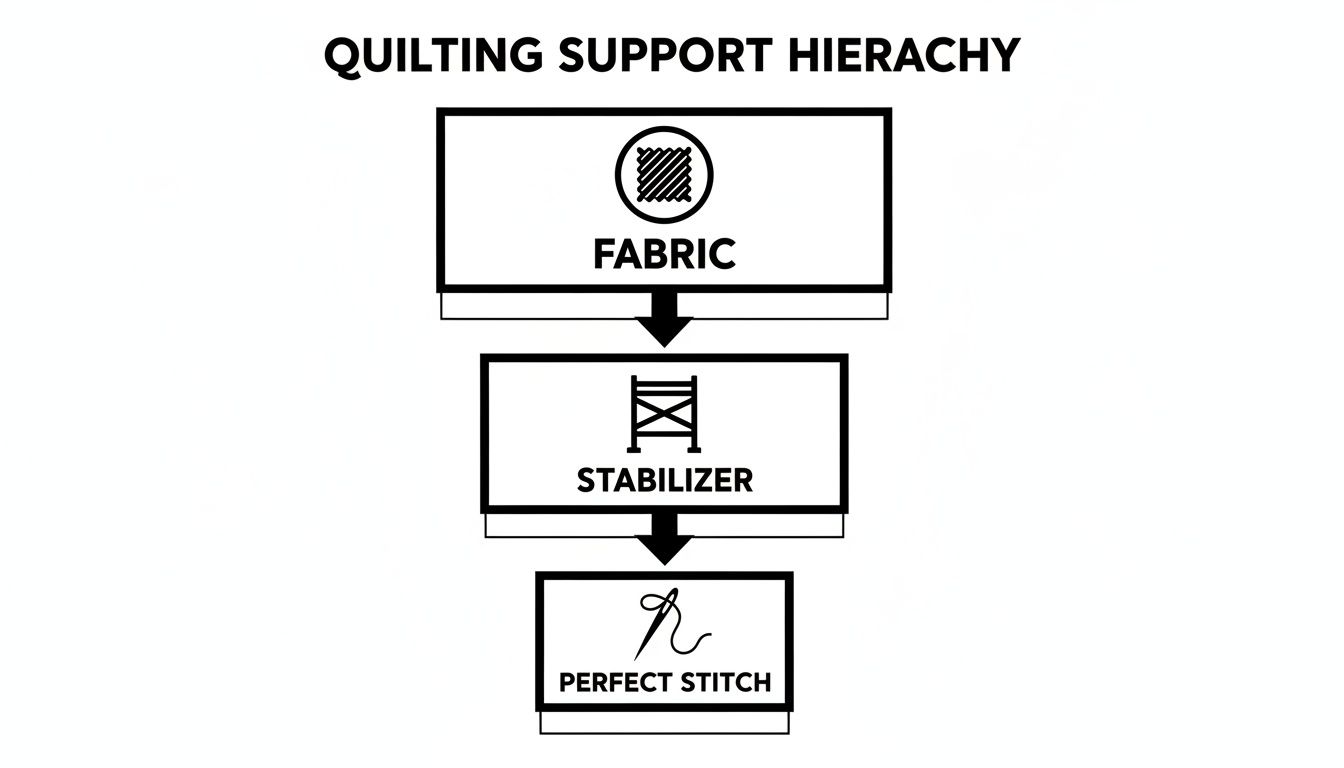
As you can see, the stabilizer is like the scaffolding for a building; it holds the fabric steady so the needle and thread can do their work flawlessly.
Cut-Away: The Permanent Foundation
Now, let's picture the permanent foundation under a house—it's built to provide support for a lifetime. That’s exactly what a cut-away stabilizer does. It’s designed to stay with your fabric forever, offering continuous stability long after the sewing machine is turned off.
This makes it your absolute best friend for anything stretchy or unstable—think knits, fleece, or that cozy sweatshirt you want to embroider. Without that lasting support, a design on a t-shirt would stretch, pucker, and lose its shape after just a couple of trips through the laundry.
A cut-away stabilizer bonds with the fabric and becomes part of the finished piece. When you're done stitching, you just trim the excess away, leaving a soft, permanent backing that keeps your design looking crisp and professional.
Pro Tip: If you’re tackling a design with a really high stitch count, a cut-away is almost always the right answer, even on stable fabrics. It provides that unwavering support needed to prevent the fabric from bunching up and distorting under all that thread.
Wash-Away: The Disappearing Act
Sometimes, you need support that performs a vanishing act when the job is done. That's where the wash-away stabilizer comes in—it's the true magician of the sewing room. Also known as a water-soluble stabilizer, this stuff completely dissolves in water, leaving not a single shred behind.
This incredible disappearing quality makes it essential for a few key jobs where a clean finish is non-negotiable.
- Free-standing lace: You can create stunning, delicate lace using nothing but thread and a film of wash-away stabilizer.
- Topping for plush fabrics: Lay a piece on top of terry cloth, minky, or fleece to keep your stitches from getting lost in the fluffy pile.
- Sheer fabrics: It allows you to embroider on tricky materials like organza or voile without having a clunky backing show through.
After stitching, all it takes is a quick rinse or a spin in the wash for the stabilizer to melt away, leaving only your gorgeous stitches. It’s an invaluable tool for heirloom projects and detailed quilting where you want a truly flawless result.
Stabilizer Cheat Sheet for Quilters
Feeling a bit dizzy from all the options? Don't worry. This quick cheat sheet will help you find the perfect match for your next quilting or sewing project. Just find your fabric or project type to see what we recommend.
| Stabilizer Type | Best For | Support Level | Removal Method |
|---|---|---|---|
| Tear-Away | Stable, woven fabrics (quilting cotton), in-the-hoop projects, light stitching | Temporary | Tear away from stitches |
| Cut-Away | Stretchy fabrics (knits, fleece), dense embroidery designs, wearable items | Permanent | Trim with scissors |
| Wash-Away | Free-standing lace, toppers for plush fabrics, sheer materials, delicate work | Temporary | Dissolves in water |
Remember, the goal is always to support the fabric just enough to get a beautiful result without overpowering it. With a little practice, choosing the right stabilizer will become one of the easiest decisions you make in your sewing room.
Finding the Right Stabilizer for Your Quilting Project
Knowing the different types of stabilizers is a great start, but the real magic happens when you see them in action. Let's connect the dots between the products on the shelf and the actual projects on your sewing table. When you pair the right stabilizer with a specific technique, the guesswork disappears, and you're left with beautiful, professional results.
Think of it like being a chef. You wouldn’t grab a delicate crepe pan to sear a steak, right? The same logic applies here. The intense demands of machine embroidery are a world away from the fluid motion of free-motion quilting, and each job needs its own specialized support.
Machine Embroidery on Quilt Blocks
When you’re adding machine embroidery to a quilt block, you're packing thousands of tiny stitches into a small patch of fabric. All that thread creates an incredible amount of pull from every direction, which is a perfect recipe for puckered, distorted fabric. A good stabilizer isn't just a nice-to-have here; it's absolutely non-negotiable.
For most projects on standard quilting cotton, a medium-weight tear-away stabilizer is your best friend. It gives the fabric the solid structure it needs to handle the stitching, then rips away cleanly when you're done. But if you’re working with a super dense design or a lighter-weight fabric, a cut-away stabilizer is the safer choice. It provides permanent support that keeps the embroidery from stretching out over the life of the quilt.
This is a huge part of modern quilting, contributing to a global embroidery market expected to hit $7.41 billion by 2033. For quilters, especially those using popular 80/20 batting, the right stabilizer is what prevents a beautiful embroidered block from turning into a puckered mess. You can see more on these market trends and stabilizer technology to understand just how much this space is growing.
Perfecting Appliqué Edges
The goal of appliqué is to get those beautifully clean, crisp edges where one fabric meets another. The secret weapon for this is a fusible stabilizer, usually a lightweight tear-away or a specialty product called fusible web. It essentially acts as a temporary glue, holding your appliqué piece perfectly still.
Here’s the basic process:
- Trace your design onto the paper side of the fusible stabilizer.
- Iron the stabilizer onto the wrong side of your appliqué fabric.
- Cut out the shape perfectly along your traced lines.
- Peel off the paper backing and iron the shape right onto your background fabric.
This simple technique completely eliminates any shifting or sliding while you sew your satin stitch or blanket stitch around the edges. The result is flawless shapes with no fraying or wiggling. For a complete walkthrough, check out our guide on using fusible interfacing for quilting.
Free-Motion and Longarm Quilting
If you love the artistic flow of free-motion or longarm quilting, you know that fabric drag is the enemy of smooth, even stitches. As you glide the fabric under the needle (or the machine over the fabric), any little bit of resistance or stretching can ruin your stitch length and tension. This is where a lightweight stabilizer, often a wash-away or a very fine tear-away, can be a game-changer.
By floating a layer of lightweight stabilizer under your quilt sandwich, you create a slicker, more stable surface. This reduces friction and allows the layers to glide smoothly, giving you greater control and promoting beautifully uniform stitches across the entire quilt top.
Pro Tips for Using Stabilizers with Quilt Batting
This is where the real magic happens. Learning how to get your stabilizer and quilt batting to play nicely together is what separates a good quilt from a truly stunning one. When these two elements work in harmony, you get flawless stitches and zero fabric drag. It’s a bit like baking—the right balance of ingredients is everything.
The goal is always to complement your batting, never to overpower it. Take a high-loft wool batting, for example. It’s already got plenty of body and volume. If you pair it with a heavy, dense stabilizer, you’ll end up with a quilt that feels more like a board than a blanket. In that scenario, a lightweight tear-away or wash-away is the perfect partner, giving just enough support without adding stiffness.
On the other hand, a thin, low-loft cotton batting might struggle to hold its own against a really dense embroidery design. That’s when you call in a medium-weight cut-away stabilizer. It provides a solid foundation for all that intricate thread work, ensuring the quilt block doesn’t pucker or distort. If you're new to the term "scrim," our guide on what scrim in batting is is a great place to start.
Creating the Perfect Quilt Sandwich
Anyone who's worked on a longarm or tackled a massive quilt knows the struggle of getting that quilt sandwich perfectly smooth and stable. Pins are tedious and can leave you with tiny, frustrating puckers. This is exactly where temporary adhesive sprays earn their keep.
A light, even mist of fabric adhesive between your quilt top, batting, and backing essentially turns three separate layers into a single, cohesive unit. When you combine this trick with a "floated" layer of lightweight stabilizer, you completely eliminate any chance of shifting. The result? A beautifully taut surface that glides under your needle, giving you incredible control and stitch quality.
Pro Tip: Tackling dense embroidery on a quilt block? Try a "stabilizer sandwich." Place a medium-weight cut-away behind the block, and then float a sheet of lightweight tear-away or wash-away on top. This prevents your stitches from sinking into the fabric and disappearing.
This kind of precision isn't just a fancy technique; it's a massive time-saver, especially in a professional setting. With the global sewing machines market recently hitting $4.56 billion USD, efficiency is king. For studios buying batting in 90" or 120" widths, using the right stabilizers for sewing can reduce fabric feed problems and boost productivity by 25-30% on a longarm. It’s no wonder quilt shops often bundle these supplies together—they know it’s a winning combination. For more data, check out the global sewing machine market report.
Smart Layering Strategies
I can't stress this enough: always, always test your stabilizer and batting combo on a scrap of fabric first. That little five-minute test can save you a world of headache later.
- For dense quilting: A lightweight tear-away gives you the support you need without making the quilt feel heavy.
- For specialty threads: When you're using metallic or other fussy threads, a topper (like a wash-away stabilizer) is your best friend. It helps the thread lie flat and look its best.
- For T-shirt quilts: This one is non-negotiable. Every knit block needs a permanent fusible stabilizer on the back to stop it from stretching out of shape.
When you start thinking strategically about how your materials interact, you move beyond just following a pattern. You begin to elevate your quilting from a craft to a true art form, ensuring every project is a masterpiece of stability and precision.
How to Solve Common Stabilizer Problems
Let's be honest—even with a perfect plan, things can go sideways in the sewing room. We’ve all been there. The good news is that most issues you’ll run into with stabilizers for sewing are surprisingly easy to figure out and fix.
Think of yourself as a sewing detective. Every problem leaves clues, and learning to read them turns frustrating moments into "aha!" moments. Let's walk through the most common headaches and how to solve them for good.
Diagnosing Fabric Puckering
Puckering is the absolute worst, isn't it? It’s when your fabric gathers into those tiny, ugly wrinkles around your stitches, and it’s almost always a cry for help from your fabric. It’s telling you that the stabilizer isn't strong enough to handle the thread tension from your design.
When you see puckering, the fix is usually pretty simple. You've asked a lightweight stabilizer to do a heavyweight's job, and it just can't keep up.
- Solution 1: The most direct fix is to switch to a heavier stabilizer. If your design is dense, a medium-weight cut-away is your best friend. It provides that rock-solid foundation your stitches need.
- Solution 2: Don't have a heavier weight on hand? No problem. Just add more layers. Doubling or even tripling up on a lightweight stabilizer can often provide the support you need in a pinch.
A great rule of thumb to remember: The more stitches you pack into a small area, the more support your fabric needs. It's always better to over-stabilize than under-stabilize.
When Your Project Feels Too Stiff
Ever finish a beautiful project, only to find it feels like cardboard? This is a classic sign of using the wrong type of stabilizer. You've most likely used a permanent cut-away on a project that really needed something temporary.
While cut-away is a hero for stretchy knits, it can leave quilting cottons feeling stiff and unnatural.
- For a Softer Finish: This is where a wash-away stabilizer truly shines. It gives you incredible support while you're stitching and then—poof!—it rinses out completely, leaving your fabric with its original softness and drape.
- For Most Woven Fabrics: A tear-away is often the perfect happy medium. It does its job beautifully and then gets removed, letting your fabric relax back to its natural state.
Removing Stubborn Residue
You’ve finished your masterpiece, removed the stabilizer, but now you’re left with a sticky mess from an adhesive spray or tiny, fuzzy bits of tear-away that just won’t budge.
- For Sticky Residue: Grab a cotton ball and a little rubbing alcohol. It works wonders at lifting that gunk. Just make sure to test it on a hidden scrap of your project fabric first to be sure it won't affect the color.
- For Pesky Tear-Away Fibers: Resist the urge to pick at them with your fingers—that can mess with your stitch tension. Instead, use a pair of fine-tipped tweezers to gently pull the fibers out, always working parallel to your stitches to keep everything looking sharp.
Smart Buying Strategies for Your Studio
Stocking your sewing space is a balancing act between creative ambition and a healthy budget. When it comes to stabilizers for sewing, a little forward-thinking can save you a lot of headaches and money, ensuring you never run out mid-project or overbuy stuff you'll never use. The first thing I always consider is the stabilizer's weight.
Think of stabilizer weight as a matchmaking service for your fabric. It’s not just a random number; it's a guide to giving your material the support it needs to shine. The simplest rule I've learned over the years is to try and mirror the weight of your fabric.
- Lightweight Stabilizers: These are your best friends for delicate materials like standard quilting cottons or voile. They offer just enough support to keep things stable without adding any noticeable bulk.
- Medium-Weight Stabilizers: This is the workhorse of my studio. It’s perfect for those slightly heavier fabrics or embroidery designs with a decent number of stitches. If you do a little bit of everything, this is your most versatile choice.
- Heavyweight Stabilizers: Break these out for the tough stuff. I'm talking dense fabrics like denim and canvas, or those incredibly complex embroidery designs with thousands of stitches that would turn lighter fabrics into a puckered mess.
Choosing Widths and Buying in Bulk
Let me give you a piece of advice I wish I’d taken sooner: stop buying those little pre-cut packages. For any serious quilter or studio owner, buying stabilizer by the roll is a game-changer. The price per yard drops dramatically, and those savings really add up.
Think about the widths you use most. If you're already buying 96-inch quilt batting for your projects, it just makes sense to grab a 40-inch or 60-inch wide roll of stabilizer. You’ll have so much less waste, especially when you're working on a longarm.
Aligning your stabilizer and batting purchases is a simple but powerful efficiency hack. It streamlines your inventory, saves money, and ensures you always have the right-sized materials on hand for any project that comes your way.
Building a smart inventory is about being ready for inspiration to strike. When you invest in a few versatile rolls of stabilizer in the weights and widths that fit your work, you can tackle any creative challenge with confidence. If you're looking to build up your core supplies, a great place to start is by exploring a trusted lineup like the Pellon stabilizers.
Got Questions About Stabilizers? We've Got Answers.
When you're deep in a project, the last thing you want is a stabilizer mishap. It's totally normal to have questions as you navigate all the options out there. We've pulled together some of the most common questions we hear from quilters to give you the clear, practical answers you need.
Can I Just Use Interfacing Instead of a Stabilizer for Embroidery?
This is a classic question, and it's easy to see why people ask! While they look and feel a bit similar, interfacing and stabilizer have completely different jobs. Think of interfacing as a permanent part of the garment—it’s meant to stay there forever, adding structure to things like shirt collars or cuffs.
A stabilizer, on the other hand, is a temporary support system. Its only job is to hold your fabric perfectly still while you embroider, preventing those frustrating puckers and skipped stitches. Once the stitching is done, you get rid of it. For any project with dense embroidery, a real stabilizer is your best bet for a professional, clean finish.
How Do I Pick the Right Weight of Stabilizer?
This is simpler than it sounds. A great rule of thumb is to try and match the weight of your stabilizer to the weight of your fabric.
- Lightweight fabrics, like your go-to quilting cottons, do best with a lightweight stabilizer.
- Heavier fabrics, such as denim, canvas, or thick fleece, need the extra muscle of a medium or heavyweight stabilizer to keep them from shifting.
Don't forget to think about your stitch count, too. The more stitches you're packing into a design, the more support your fabric is going to need.
A Pro Tip From Our Studio: If you're out of medium-weight stabilizer, don't panic! Layering two pieces of a lightweight stabilizer often gives you the same fantastic support. It's a great trick that adds a ton of flexibility to your stash.
Is It Okay to Layer Different Kinds of Stabilizers?
Yes, absolutely! Layering is a secret weapon for tackling really complex or tricky projects. It's a technique the pros use all the time.
For designs with incredibly high stitch counts, try placing a cut-away stabilizer on the bottom for rock-solid support and then floating a piece of tear-away or wash-away on top. This combination keeps the fabric perfectly stable during the heavy stitching, but still makes the final cleanup a breeze. You truly get the best of both worlds: unshakeable support and a beautiful, clean result.
Here are a few more common questions we often get about choosing and using stabilizers.
| Question | Quick Answer |
|---|---|
| What happens if I use the wrong stabilizer? | You might see puckering, fabric stretching, or distorted stitches. For a cut-away, you could risk damaging delicate fabric during removal. |
| Can I pre-wash my stabilizer? | No, definitely not. Stabilizers are designed to be used straight off the roll. Washing them beforehand will ruin their supportive qualities. |
| How do I store my stabilizer rolls? | Keep them rolled up (not folded) and away from moisture and extreme heat. Storing them upright in a bin is a great way to keep them clean and ready to use. |
| Is water-soluble stabilizer safe for all fabrics? | It's safe for most washable fabrics. Just be cautious with materials that can't get wet, like velvet, certain silks, or leather. Always test a small corner first! |
Ultimately, a little bit of testing on a scrap of fabric can save you a huge headache later on. Every machine, fabric, and design is a little different, so a quick sample run is always time well spent.
At Quilt Batting, we know that the right foundation is the secret to a project you can be proud of. Take a look at our collection of premium stabilizers and batting to make sure your next quilt is a masterpiece. Find the perfect support for your quilts today!