

Binding a quilt by hand isn't just the last step—it's the final, loving touch that transforms your project into a true heirloom. This traditional, almost meditative process encases the raw edges of your quilt sandwich, creating a soft, durable, and seamless finish that’s built to be cherished for generations.
Why a Hand-Stitched Finish Elevates Your Quilt
After all the hours you've poured into piecing and quilting, it's tempting to rush through the binding. I get it. But I encourage you to see it differently—not as a chore, but as your personal signature on a masterpiece. Hand-binding is the final act of creation, the one that truly cements your quilt's heirloom quality.
It’s a chance to slow down, feel the texture of your work, and really appreciate what you've made. This approach is more than just practical; it’s a beautiful nod to a long history of craftsmanship.
The Beauty of a Traditional Finish
Let's be honest: machine stitching just can't replicate the look and feel of a hand-sewn binding. Instead of a stiff, top-stitched edge, you get a soft, pliable border that drapes beautifully with the rest of the quilt. It’s a difference you can feel, especially on a quilt destined for snuggling.
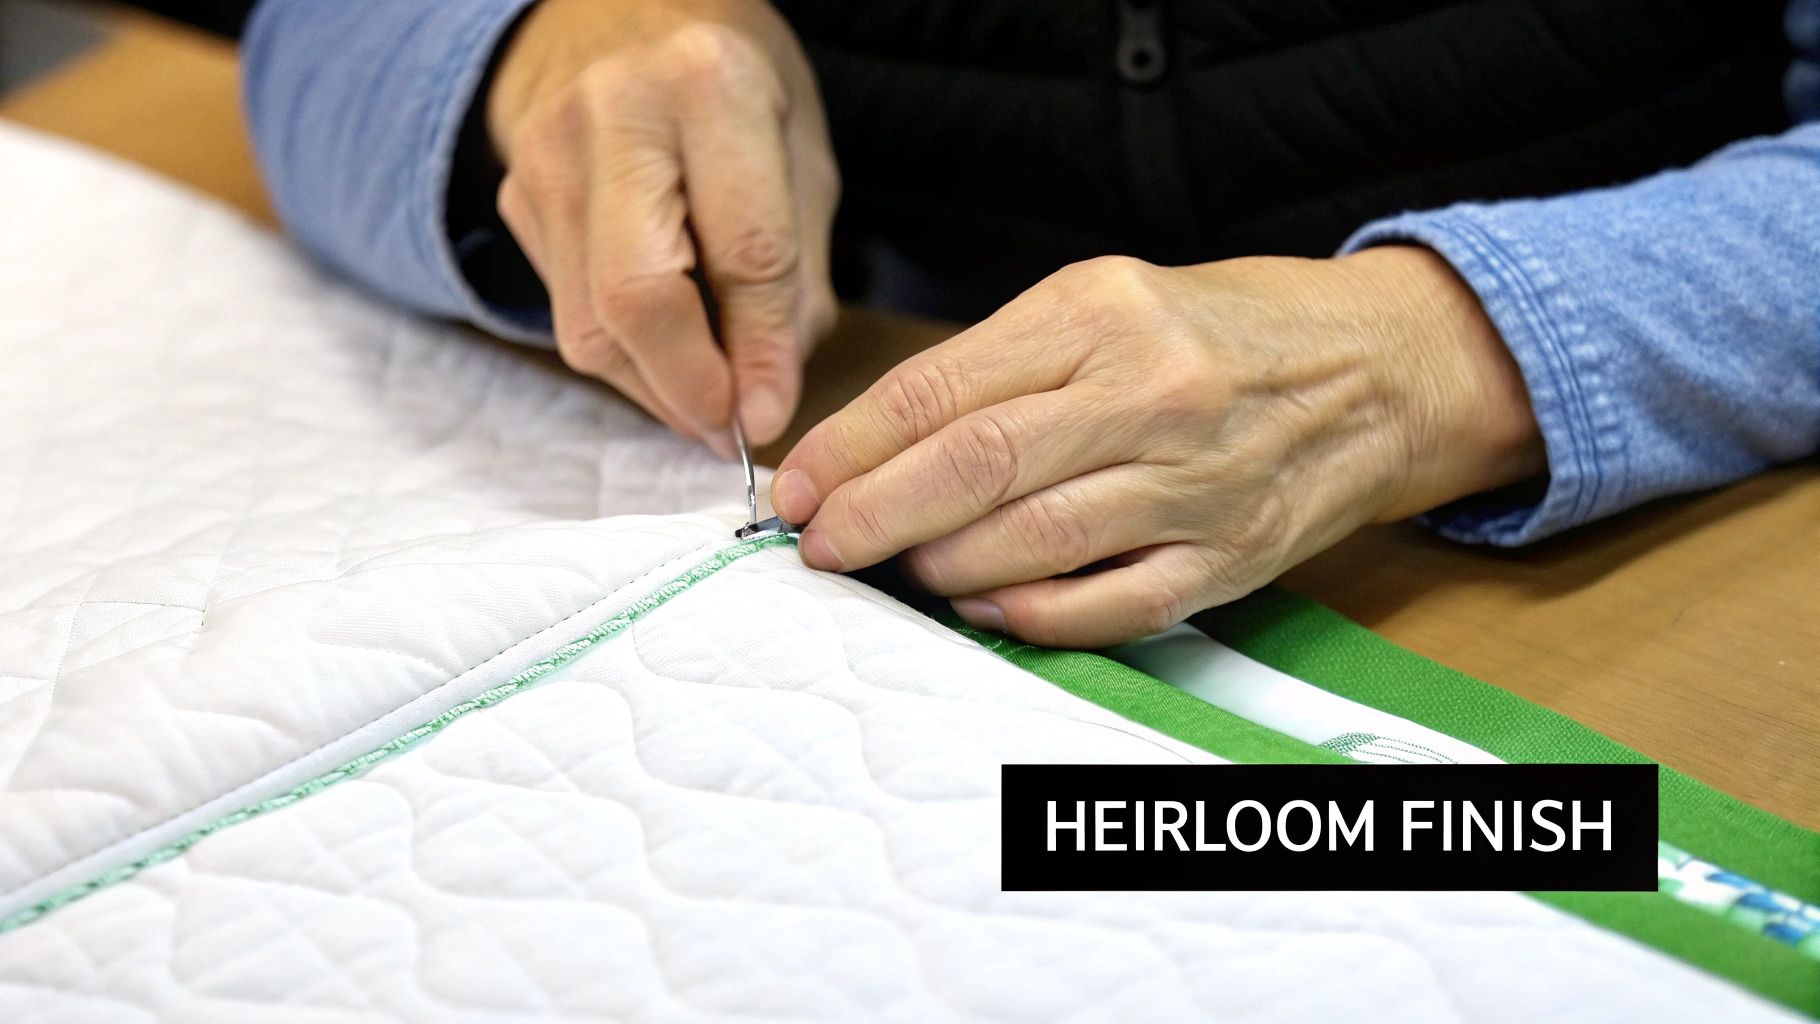
The real magic is in the nearly invisible stitches. A hand-bound edge creates a clean, professional look from both sides. It’s this meticulous detail that signals true artistry and care, making the quilt feel thoughtfully and completely finished.
Choosing the right materials here is key. A reliable batting, like a Hobbs 80/20 blend, gives you the perfect foundation. It provides stability without making the edges too bulky, ensuring your hand-stitching is smooth and the end result is flawless.
A Connection to Quilting History
When you choose to bind by hand, you're tying your work to centuries of tradition. Hand-binding is one of the most cherished practices in quilting, with roots stretching all the way back to the 12th century.
By the colonial era in America, quilters were meticulously hand-sewing their bindings, either by turning the raw edges inward or applying a separate fabric strip. You can explore the rich history of hand-finishing quilts and see their cultural significance. This historical depth adds another layer of meaning to every single stitch, turning your quilt into a piece of living history.
Getting Your Quilt Ready for Binding
A stunning hand-bound finish doesn't just happen with the first stitch. It starts with careful prep work. Taking the time to gather the right tools and accurately figure out your fabric needs is what sets you up for success and saves you from a lot of headaches later on. Think of it as laying a solid foundation before you build the house.
Getting your supplies in order isn't just about grabbing things from a drawer; it's about choosing the right things. You'll absolutely need a sharp rotary cutter and a self-healing mat—they're the only way to get those perfectly straight, clean edges. When it comes to marking, I'm a big fan of using a hera marker. It makes a crisp crease in the fabric for folding without leaving any ink behind, which is a total game-changer for precision.
How Much Fabric Do You Really Need?
Nothing is worse than running out of binding fabric when you're just inches from the finish line. Trust me, I've been there. Let's ditch the guesswork and use a simple formula to get it right every single time.
First, you need the perimeter of your quilt. Just add up the lengths of all four sides.
Let's say you have a quilt that’s 60 inches by 70 inches. Your perimeter is 260 inches (60 + 60 + 70 + 70).
Now, add an extra 10 to 15 inches to that number. This little bit of buffer is crucial for joining the ends and getting those perfect mitered corners. So, our new total is around 275 inches.
Finally, divide that total by the width of your fabric (WOF), which is usually about 42 inches. For our example, that's 275 ÷ 42 = 6.54. You always, always round up, so you’ll need to cut 7 strips of binding fabric.
Once your quilt top is all squared up, you’ll need to secure all the layers together. If you need a refresher on that, we have a great guide that walks you through how to baste a quilt properly.
To make things even easier, here's a quick cheat sheet for standard quilt sizes.
Binding Fabric Requirements by Quilt Size
This table is a handy reference for estimating how much fabric you'll need for binding, based on standard quilt sizes and using 2.5-inch wide strips.
| Quilt Size | Typical Dimensions (Inches) | Total Binding Length Needed (Inches) | Fabric Yardage Required |
|---|---|---|---|
| Crib | 36" x 52" | 186" | 3/8 Yard |
| Throw | 50" x 65" | 240" | 1/2 Yard |
| Twin | 70" x 90" | 330" | 5/8 Yard |
| Queen | 90" x 108" | 406" | 3/4 Yard |
| King | 108" x 108" | 442" | 1 Yard |
Just remember, these are estimates! It's always a good idea to measure your finished quilt top and do the math yourself, just to be safe.
Making a Continuous Binding Strip
If your quilt has curved edges, bias binding is a must. But even for straight-edged quilts, it adds a touch of class and incredible durability. Making one continuous strip is way easier than it looks.
Start by cutting your fabric strips. A width of 2.5 inches is the gold standard for a reason—it just works perfectly for most quilts.
To join your strips, place two of them right sides together, forming a 90-degree angle. Then, sew diagonally from one corner to the other. This diagonal seam is key because it distributes the bulk, making the join much stronger and more flexible than a simple straight seam.
Pro Tip: After sewing that diagonal seam, trim the excess fabric about ¼ inch away from your stitching. Then, press the seam open. This little step makes a world of difference in reducing bulk, which helps your binding lie beautifully flat against the quilt edge.
Once all your strips are sewn together into one long piece, press the entire strip in half lengthwise with the wrong sides together. And just like that, your binding is prepped and ready to attach. Now the real fun begins
Getting the Binding On and Nailing Those Mitered Corners
Alright, this is where the magic really starts to happen. We're about to give your quilt its frame, and we'll do it using a smart combination of machine speed and hand-stitched finesse. Attaching the binding to the front of the quilt with your machine gives you a super strong and stable base. The real artistry, though, comes alive in those beautifully crisp mitered corners and that final seamless join.
Think of this process as connecting with a long line of quilters. Before sewing machines became a household staple in the 1850s, binding a quilt was an incredibly meticulous, hands-on part of the craft. Women would pour hundreds of hours into a single quilt, from the first piece to the very last binding stitch. As you work, you're part of that rich history.
The image below breaks down the prep work—the essential first moves before the binding even touches your quilt.
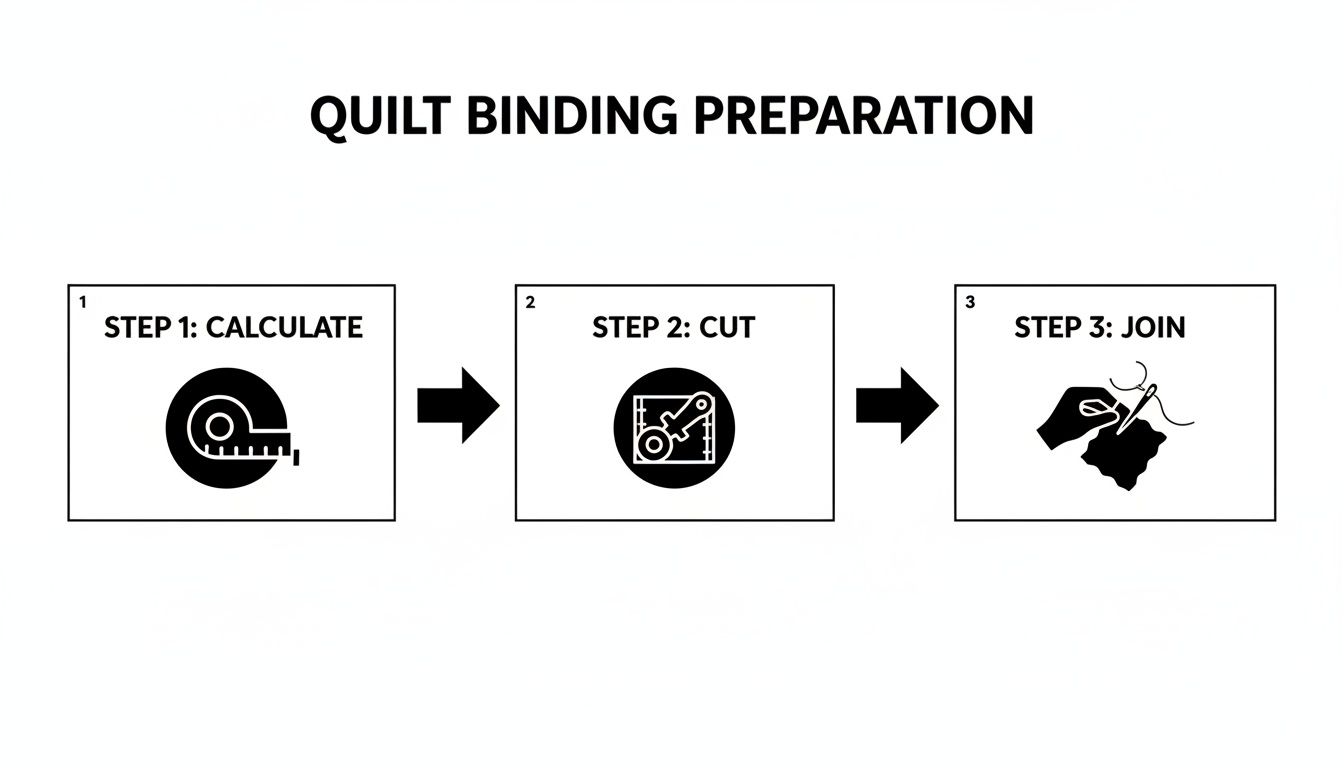
Getting these three steps—calculating, cutting, and joining—right from the start is the key to a frustration-free finish. It ensures your binding strip is perfectly prepared and ready to go.
Starting Your Machine Stitching
Let's get sewing. First thing's first: leave a long 8-10 inch tail of binding loose before you start stitching. You'll need this at the end to connect the two ends neatly.
Align the raw edge of your prepared binding strip with the raw edge of your quilt top. Start sewing somewhere in the middle of one of the sides, not near a corner. Stick to a precise ¼ inch seam allowance.
If you have a walking foot, now is its time to shine. It's a game-changer for preventing the layers from shifting or puckering, ensuring your binding lays perfectly flat.
A little tip from my sewing room: Don't start right at a corner. Kicking things off in the middle of a straight edge gives you plenty of breathing room for joining the ends later. It’s a tiny detail that saves a massive headache.
As you get close to the first corner, slow down. You want to stop sewing exactly ¼ inch from the quilt's edge. Precision is key here. Do a quick backstitch to lock in your seam, then lift your presser foot and pull the quilt away from the needle.
The Foolproof Mitered Corner Technique
This is the part that can feel intimidating, but I promise, you've got this. Once you've stopped ¼ inch from the corner, take your binding strip and fold it straight up, away from the quilt. This should create a clean 45-degree angle. The raw edge of the binding you just folded should line up perfectly with the raw edge of the quilt side you're about to sew.
Hold that fold with your finger. Now, fold the binding strip straight back down over itself. The top folded edge should now be perfectly aligned with the top raw edge of the quilt, and the side raw edge of the binding should be flush with the next side you're about to sew. Pop a pin in there to hold it.
Place the quilt back under the needle. Start stitching right at the very top edge and continue down the next side, maintaining that consistent ¼ inch seam allowance. You'll repeat this exact folding-and-sewing motion for all four corners. If you're curious about other ways to finish a quilt, we have a great guide on different techniques of quilting.
Creating that Invisible Join
After you've turned the final corner, keep sewing until you're about 12-15 inches away from where you first started. Stop and cut your thread. You should now have a gap with two long binding tails. This is where we’ll work our magic to create a join that no one will ever spot.
Take the two tails and overlap them in the gap. Trim the first tail so it extends exactly 2.5 inches past the start of the second tail (this works perfectly if you used 2.5-inch wide binding strips). Then, trim the second tail so its raw edge butts up perfectly against the trimmed end of the first tail.
Now, open up both tails. Place them right sides together, forming a 90-degree angle, just like you did when you first joined all your binding strips. Draw a diagonal line from corner to corner and sew right on that line.
Before you trim anything, finger-press the seam open and lay the binding flat in the gap to double-check the fit. It should be perfect—not too tight, not too loose. Once you're happy with it, trim the excess fabric to a ¼ inch seam allowance and press the seam open.
All that's left is to fold the newly joined binding back into place along the quilt edge and stitch that final gap closed. Your binding is now fully attached, your corners are beautifully mitered, and you're ready for the relaxing final step of hand-stitching it all down.
Perfecting Your Hand Stitch for an Invisible Finish
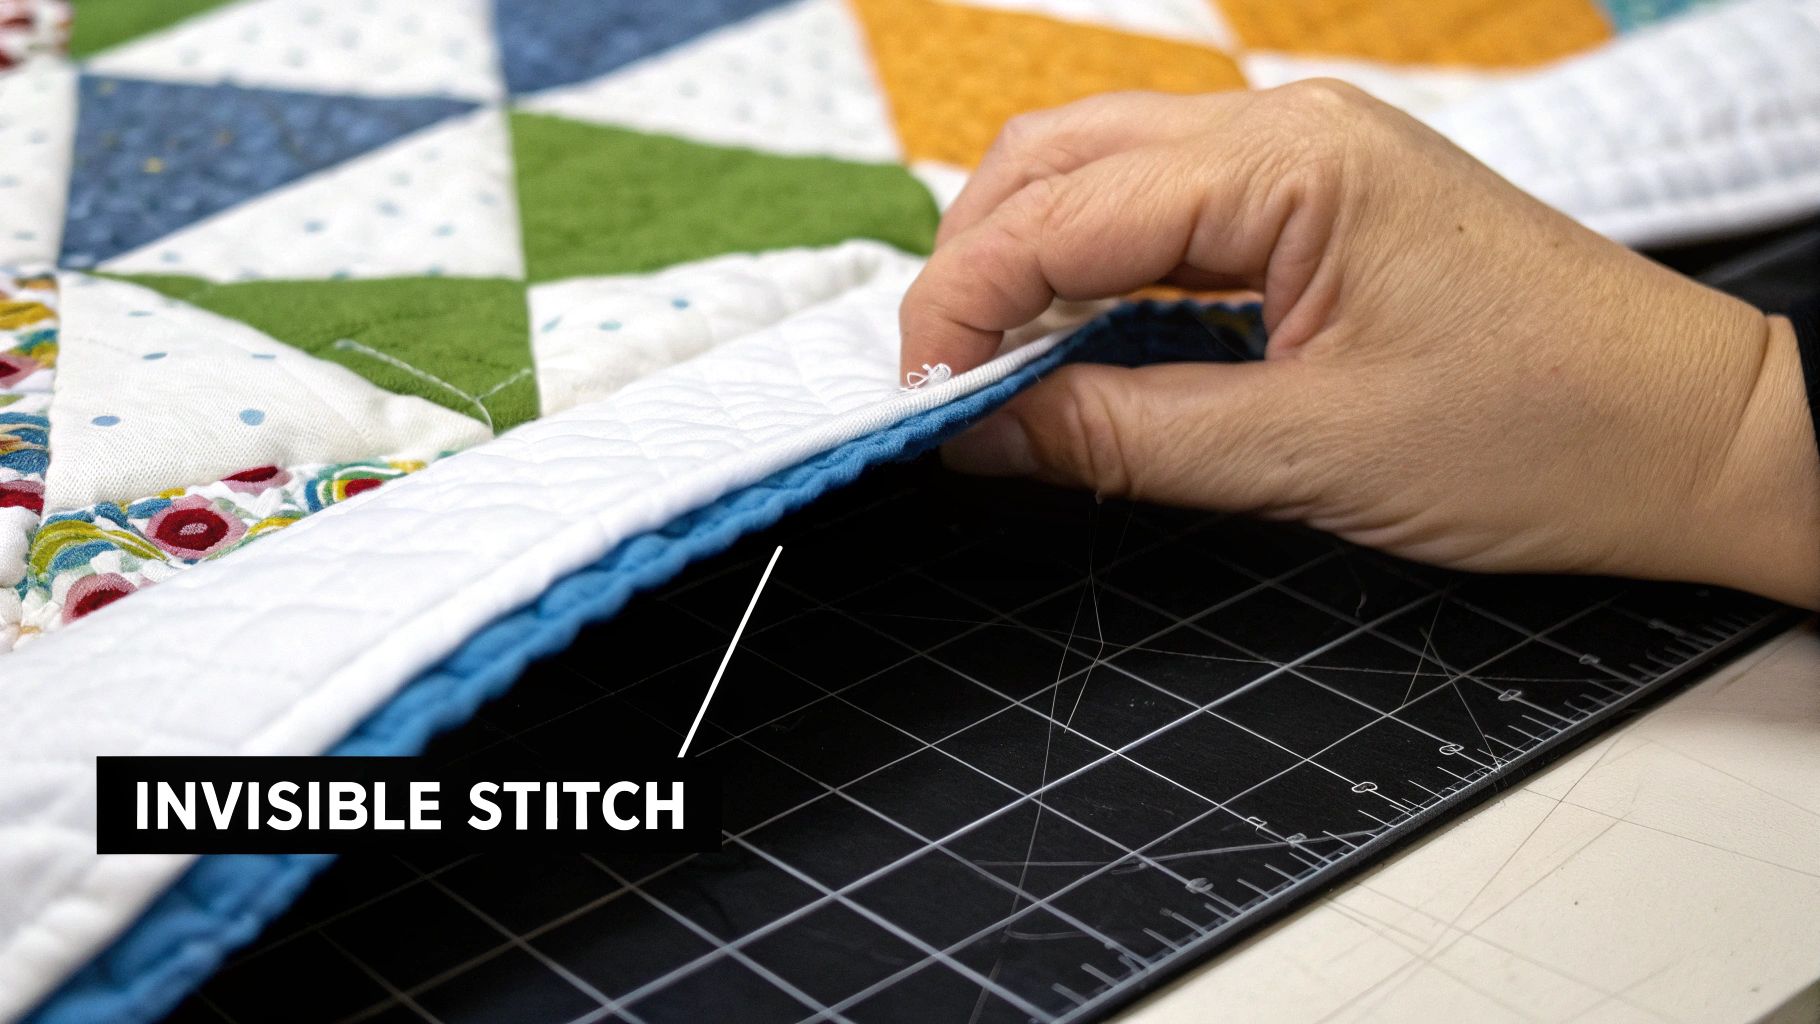
This is my favorite part. It’s time to settle in with your needle and thread for the quiet, rhythmic process that brings the entire quilt together. Our goal here isn’t just to tack down the binding; we're creating a finish so clean and seamless it looks like the binding simply fused itself to the back of the quilt.
The secret to this magic trick is the ladder stitch, which you might also know as the invisible stitch. It's a surprisingly simple technique that, once you get the hang of it, becomes one of the most satisfying parts of making a quilt.
Gearing Up for the Final Step
The right tools make this process feel less like a chore and more like a relaxing ritual. You really don’t need much, but the quality of what you choose makes a huge difference.
- Needle: I always reach for a hand-quilting needle, often called a "between." They’re short, strong, and give you fantastic control over your stitches. A size 8 or 9 is a great place to start.
- Thread: My absolute go-to is a high-quality 50wt cotton thread. It’s strong enough to last a lifetime but fine enough to sink right into the fabric and disappear. Always match your thread color to the binding fabric, not the quilt backing. This is key for camouflage!
- Thimble: Please, don't skip this! A comfortable thimble saves your fingers and helps you push the needle through all those layers with consistent, even pressure. I’m a big fan of leather thimbles because they mold to your finger over time.
Once you're ready, cut a manageable length of thread—I find about 18 to 24 inches is perfect. Go any longer, and you're just asking for frustrating tangles.
Mastering the Invisible Ladder Stitch
This stitch is all about creating a hidden seam by traveling inside the fabric folds. It sounds tricky, but let's break it down.
First, you need to bury your knot. Push your needle into the quilt backing about an inch away from where you plan to start, but only go through the backing fabric—don't pop through the top. Slide the needle through that backing layer and bring it up right where the binding edge will lay. Give the thread a gentle but firm tug to "pop" the knot through, hiding it completely inside the quilt sandwich.
Now, for your first stitch. From where your thread came out, go directly across and catch the folded edge of the binding. Run your needle inside that tiny fold for about ¼ inch, then bring it back out.
Next, go straight back across to the quilt backing, right below where you just exited the binding. Travel another ¼ inch through the backing fabric (again, not the batting or top), and bring your needle up. You're basically creating parallel "rungs" of a ladder that are hidden from view.
My Favorite Moment: After every four or five stitches, gently pull your thread taut. You’ll see the stitches disappear as the binding snugs up perfectly against the quilt back. It is so satisfying to watch that seam just vanish.
Keep that rhythm going: a small stitch inside the binding fold, then a small stitch in the quilt backing. Keeping your stitches small and evenly spaced is what gives you that professional, heirloom-quality finish.
Tips for Comfortable and Consistent Sewing
Let's be real—handling a big quilt can be awkward. Find a comfy spot on the couch where you can rest the bulk of the quilt in your lap. This stops its weight from pulling on your stitches and messing up your tension.
You'll also need a way to hold your binding in place while you work. The big debate: clips or pins?
| Tool | Why I Love It | What to Watch Out For |
|---|---|---|
| Binding Clips | Super easy to move, they won't pierce your fabric. | A little bulky; can sometimes slip on silky fabrics. |
| Pins | Low profile, very secure, and cheap! | They can prick your fingers or distort delicate weaves. |
I'm firmly on team clips. They slide along with me as I sew and are a breeze to reposition without leaving any holes behind. Ultimately, the right choice is whatever makes the stitching process feel smooth and enjoyable for you.
And remember, your finishing stitches can be more than just functional. If you want to explore how to turn them into a beautiful design element, our guide to hand quilting designs is full of wonderful ideas.
How Your Batting Choice Shapes Your Quilt's Edges
The secret to a beautifully bound quilt? It's not just the binding fabric—it's the batting inside. What you choose for your quilt's "fluff" has a huge impact on how the final edges look and feel, and this is doubly true when you’re finishing it by hand.
Think of it this way: a thin, low-loft cotton batting lets you create a really crisp, flat edge with a modern vibe. On the other hand, if you've used a lofty wool or a thicker polyester, your binding will have a fuller, more rounded profile that feels plush and traditional. There's no right or wrong answer; it's all about the final look you're going for. If you want to dive deeper, our guide on the best batting for hand quilting is a fantastic starting point.
Taming the Bulk Before You Start
One of the biggest headaches in binding is wrangling all that bulk, especially when you get to the corners. The trick is to deal with it before you even cut your binding strips.
Once all your quilting is done and you've squared up your quilt top and backing, pause for a moment. Grab your rotary cutter and give the batting a little extra trim.
- Carefully trim the batting so it’s about 1/8 inch shorter than the quilt top and backing on all four sides.
- This simple step pulls the batting out of the seam allowance where you'll be attaching the binding.
- What you're left with is a much less bulky edge that’s a dream to fold over and stitch down neatly.
Honestly, this one small adjustment makes a world of difference. Your needle won't have to fight through as many layers, which makes the hand-stitching part so much more relaxing. Plus, your mitered corners will lie perfectly flat without that lumpy, overstuffed look.
Finishing quilt edges is a craft with a long and storied past. Techniques have been refined for centuries, from their adoption in Europe after the Crusades in the 12th century to the practical, sturdy edges found on American quilts after 1800, when fabric finally became affordable for everyday families. You can learn more about the incredible evolution of quilting techniques on Britannica.
Why Your Walking Foot is a Must-Have
Even though we're talking about hand binding, you'll want to attach the binding to the quilt top with your sewing machine first for a strong, stable foundation. And for that job, a walking foot isn't just a nice-to-have—it's essential.
A walking foot has a set of feed dogs on top that work in tandem with the feed dogs on your machine, gripping and moving all the layers of your quilt sandwich together. This completely prevents that frustrating "quilt creep," where the layers shift and leave you with puckers and waves along the edge. The thicker your batting, the more this matters. A walking foot ensures everything feeds through evenly, giving you a smooth, flat edge that's ready for your beautiful hand stitching.
Your Hand-Binding Questions, Answered
Even with the best instructions in front of you, a few questions always seem to pop up right when you’re in the middle of a project. I get it. Think of me as that experienced quilting friend you can call for quick advice to get you past those little hurdles.
Let’s walk through some of the most common snags quilters run into, from lumpy corners to picking the right thread. A few simple tweaks can get you back to stitching with confidence.
"Help! Why Are My Mitered Corners So Bulky?"
This is probably the most common frustration I hear, but don't worry, the fix is usually pretty straightforward. Bulky corners almost always happen because there’s just too much fabric trying to cram into that tiny fold.
Here’s my trick: before you fold anything, trim the batting and backing fabric just a tiny bit—about 1/8 of an inch—away from the quilt top, right at the corner. This little snip gets the thickest layers out of the way before they can cause trouble.
Then, when you go to make that mitered fold, use your thumbnail or a pressing tool to create a super sharp, crisp 45-degree angle. A single pin or even a tiny dot of fabric glue can be a lifesaver here, holding everything perfectly flat while you stitch it shut.
"What's the Best Thread to Use for Hand Binding?"
For me, nothing beats a good quality 50wt or 40wt cotton thread that matches my binding fabric. This is my go-to because it strikes the perfect balance—it's strong enough to last for years, but thin enough that your stitches will melt right into the fabric and become nearly invisible.
Now, if I'm making a quilt for a child or one I know will see a lot of action and washing, I might switch to a cotton-wrapped polyester thread. It gives you that little extra bit of strength without looking or feeling bulky.
My Favorite Trick: Before you start sewing, pull your thread through a bit of beeswax or thread conditioner. It’s an old-school move that makes a huge difference. It keeps the thread from tangling and knotting up, and your needle will just glide through the fabric.
"Can I Actually Wash a Hand-Bound Quilt?"
Yes, you absolutely can! Please do. A quilt is meant to be snuggled and used, and a well-stitched hand binding is surprisingly tough. It’s more than ready to stand up to a washing machine.
Just be gentle with it. I always recommend using a delicate cycle with cold water and a mild detergent that’s safe for colors. If you want to give those stitches extra protection, pop the quilt into a large laundry bag. Tumble dry on the lowest heat setting, or better yet, lay it flat to air dry if you have the space.
At Quilt Batting, we know that what’s inside your quilt is just as important as the stitches on the outside. The right foundation is everything. Explore our premium selection to give your next project the perfect finish from the inside out. Find your ideal roll at https://quiltbatting.shop.