

Before you can even think about how to quilt a t-shirt quilt, you’ve got to get your workspace set up with the right gear. Seriously, having the proper toolkit isn't just about making things go a little smoother—it's the single most important step toward creating a quilt that looks professional and will actually last. Skip this, and you're in for a frustrating, warped mess.
The secret? Using tools specifically designed to tame that notoriously stretchy t-shirt fabric.
Gathering Your T-Shirt Quilt Toolkit
Making a t-shirt quilt is one of the most rewarding projects out there. You’re literally stitching memories together, taking those well-loved shirts and giving them a brand new life. Each shirt is a little piece of a story, and the right supplies will help you tell that story beautifully.
And you'll have no shortage of materials to work with! With an estimated 2 billion t-shirts sold worldwide every year, the supply is practically infinite. This trend reflects a huge shift toward more casual clothing, which is great news for quilters. It’s fascinating to see how your personal project fits into these larger apparel industry statistics.
To make this process as smooth as possible, here’s a quick-glance checklist of everything you'll need.
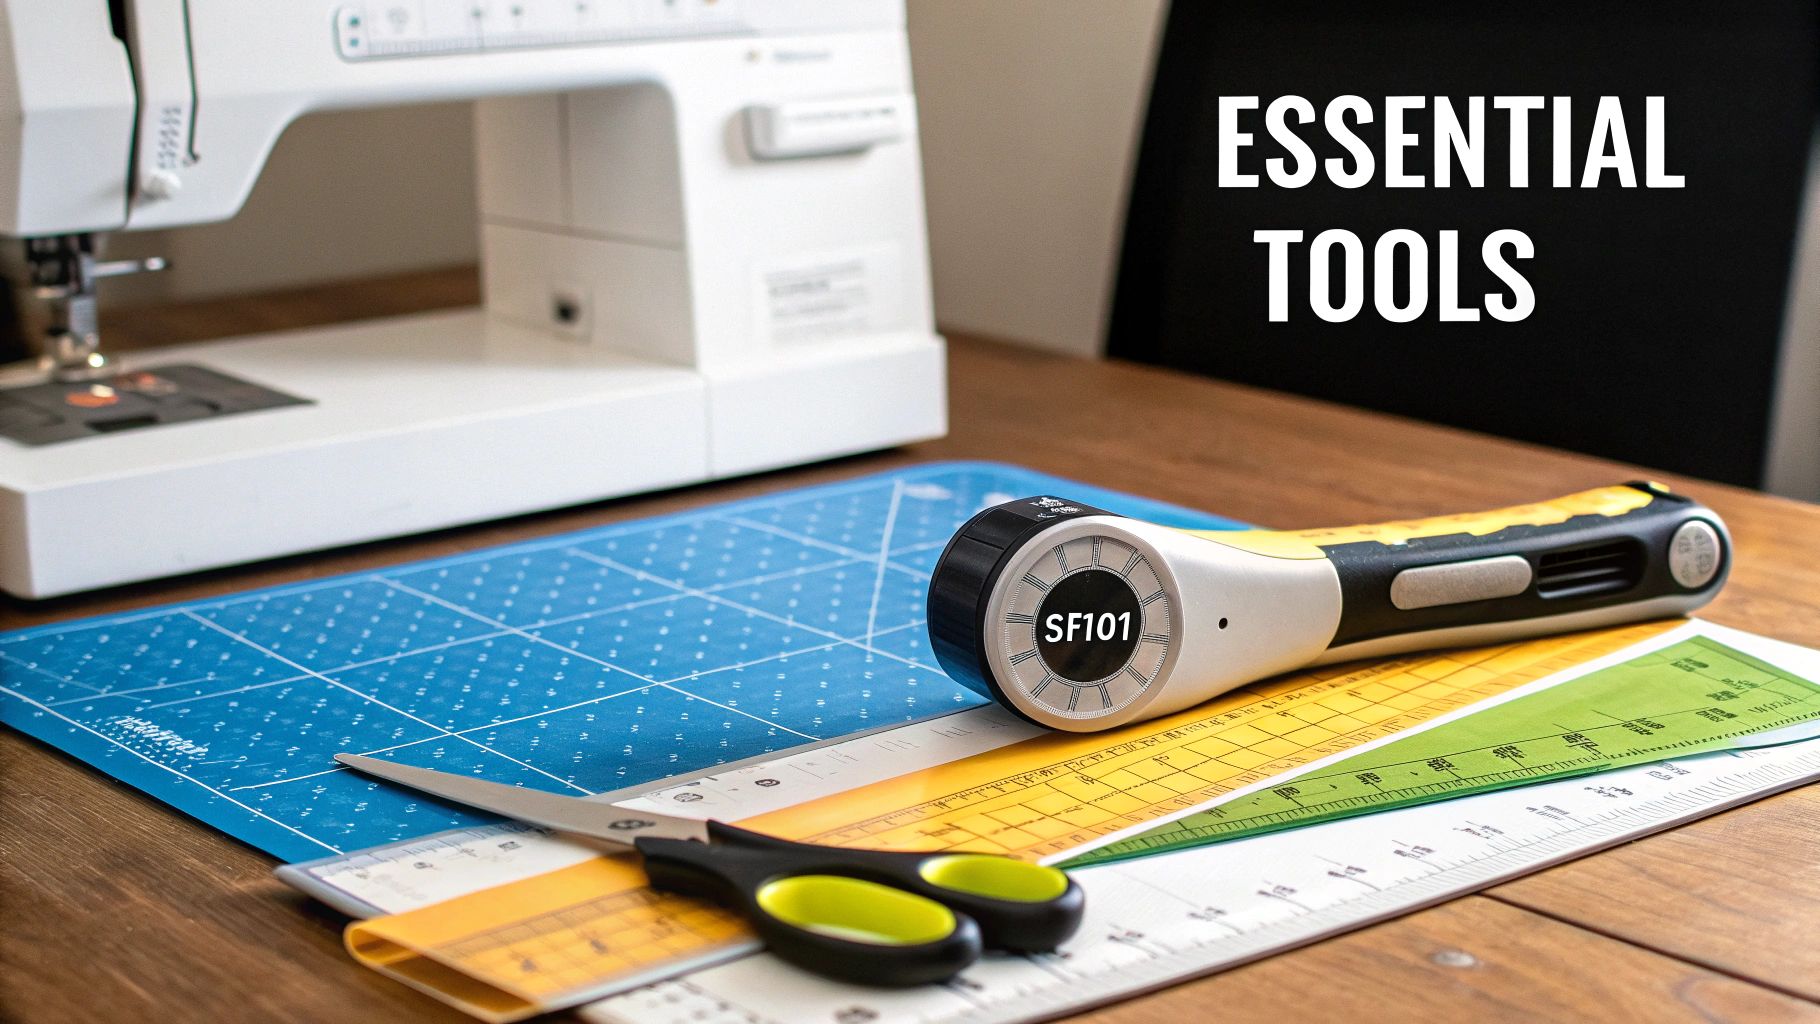
Essential T-Shirt Quilt Supplies Checklist
| Tool/Material | Purpose in T-Shirt Quilting | Pro Tip |
|---|---|---|
| Rotary Cutter | For making clean, precise cuts through stabilized fabric. | A sharp 45mm or 60mm blade is best. A dull blade will snag your fabric, even with interfacing. |
| Self-Healing Cutting Mat | Protects your work surface and preserves your rotary blade's sharpness. | Go big! A 24" x 36" mat lets you cut full blocks without constantly shifting your material. |
| Acrylic Rulers | Ensures perfectly square blocks and straight lines. | You'll want a large square ruler (15.5") and a long one (6" x 24") for trimming. |
| Fusible Interfacing | Stabilizes the stretchy t-shirt knit, making it behave like cotton. | Pellon SF101 Shape-Flex is the gold standard. It offers stability without making the quilt stiff. |
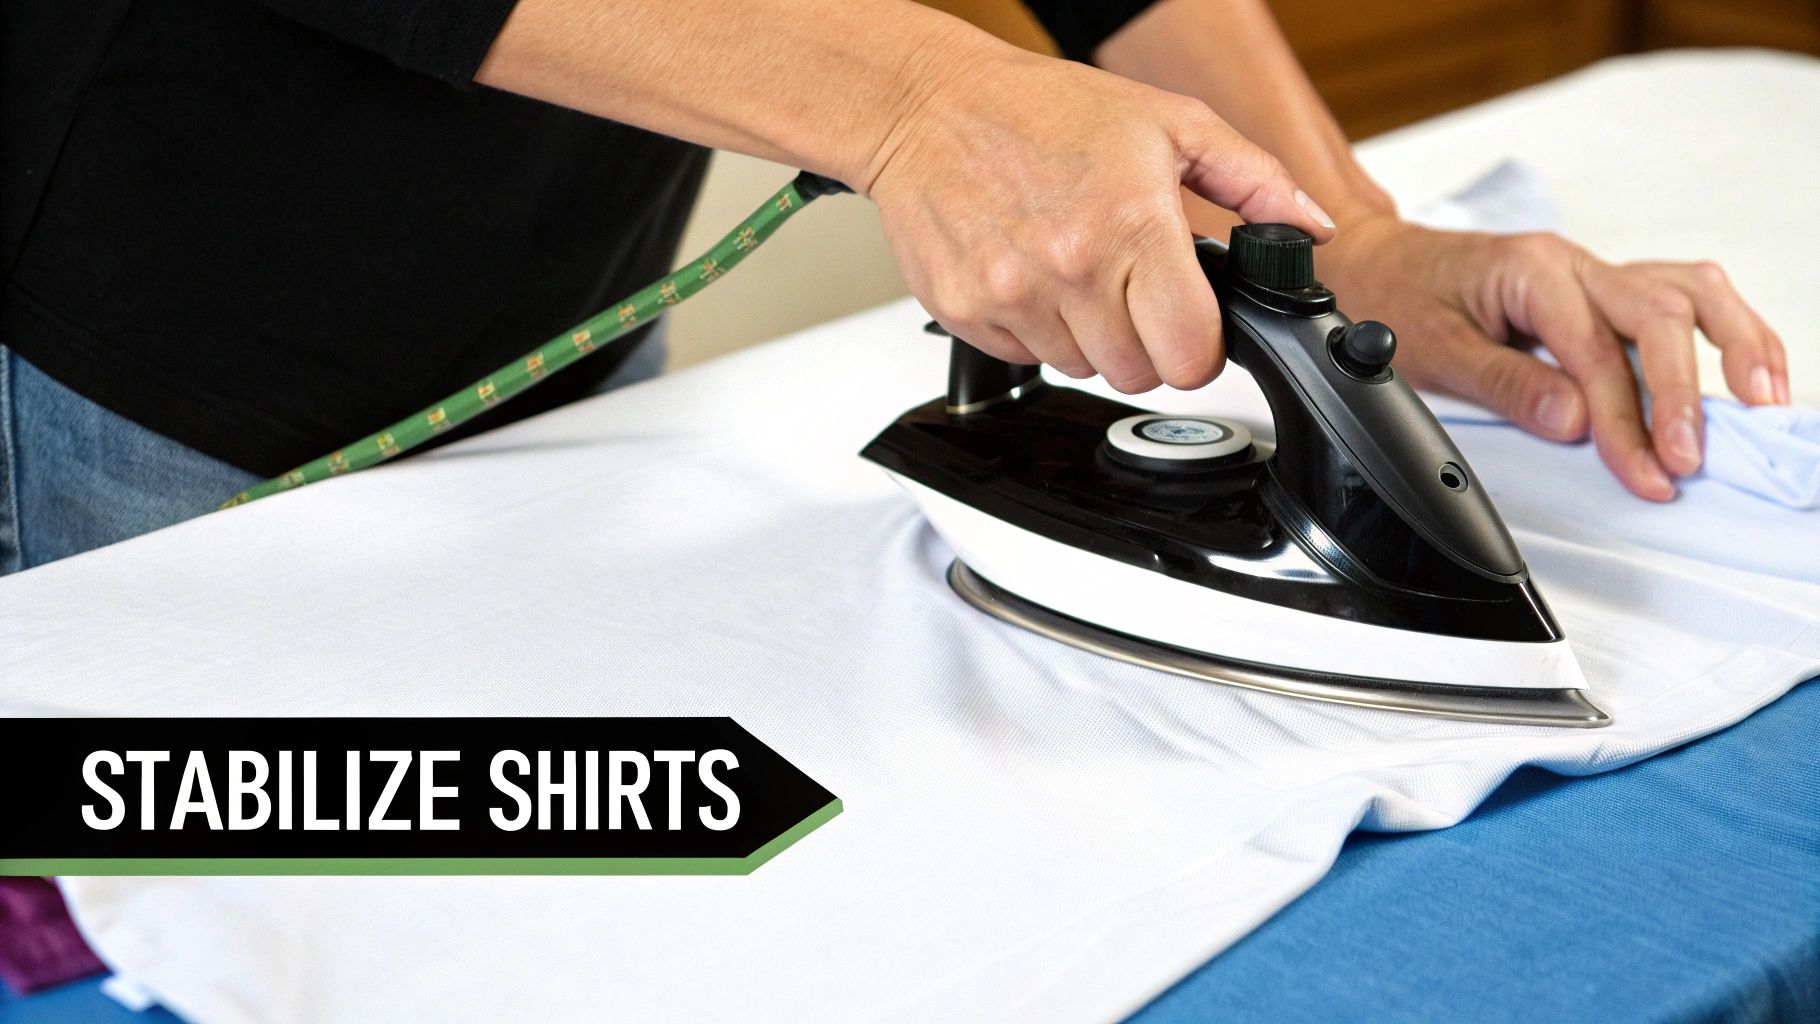
| Steam Iron | Adheres the fusible interfacing to the back of the t-shirts. | A good iron with a reliable steam function is crucial for getting a strong, even bond. |
| Sewing Machine | For piecing the quilt top and quilting the layers together. | Make sure it's clean and in good working order. No need for a fancy model! |
| Machine Needles | The right needle prevents skipped stitches and fabric pulls. | Start with a fresh size 90/14 or 100/16 universal or jeans needle. |
| Quality Thread | Holds your quilt together for years to come. | A 40wt or 50wt all-purpose polyester or cotton thread in a neutral color is a safe bet. |
| Pins or Clips | To hold your blocks together accurately while sewing. | I swear by quilting clips. They don't leave holes and are much easier to handle than pins. |
Having this gear on hand before you start will save you a ton of headaches down the road.
Cutting And Measuring Essentials
When you're piecing a quilt, precision is absolutely everything. T-shirt material, with all its stretch, is incredibly unforgiving. If your cuts are even slightly off, your blocks will warp, and you'll end up with a lumpy, homemade-looking quilt.
Your most critical investments here are:
- Rotary Cutter: This is non-negotiable. A sharp 45mm or 60mm rotary cutter will glide right through your stabilized shirts, giving you the clean, straight edges that a pair of scissors could only dream of.
- Self-Healing Cutting Mat: This is the rotary cutter’s best friend. It protects your table and keeps that expensive blade sharp. A bigger mat, at least 24" x 36", is a game-changer, giving you plenty of room to work.
- Acrylic Rulers: You’ll need a couple. I recommend a large square ruler that’s a half-inch bigger than your finished block size (e.g., a 15.5" square ruler for 15" blocks) and a long one, like a 6" x 24", for squaring things up.
If there's one mistake I see beginners make over and over, it's trying to cut t-shirt blocks with scissors. Please trust me on this: a rotary cutter and mat aren't just for convenience. They are absolutely essential for getting an accurate, professional-looking quilt.
Fabric Preparation Must-Haves
This is the magic step. This is where you transform that shifty, unstable t-shirt knit into a stable, woven-like fabric that’s an absolute dream to sew. Whatever you do, don't skip this.
The hero of this chapter is fusible interfacing. It’s a special material with a heat-activated glue on one side. When you iron it onto the back of your t-shirt, it stops the fabric from stretching and distorting.
For almost every t-shirt quilt I've ever made, I've used a lightweight woven fusible interfacing like Pellon SF101 Shape-Flex. It's the industry standard for a reason—it gives you all the stability you need without adding a bunch of bulk, so your finished quilt still drapes beautifully. You’ll also need a decent steam iron and an ironing board.
Sewing And Assembly Tools
Finally, let's talk about putting it all together. You don’t need a top-of-the-line machine, but a few specific items will make the sewing process go much more smoothly.
- Sewing Machine: Any basic machine will do, as long as it’s clean and running well.
- Needles: Start with a fresh needle! A size 90/14 or 100/16 universal or jeans/denim needle is tough enough to get through the stabilized fabric and seams without skipping stitches.
- Thread: A good quality 40wt or 50wt all-purpose polyester or cotton thread is perfect. I usually stick with a neutral color like gray or cream that blends into everything.
- Pins or Clips: While pins work, I’m a huge fan of quilting clips (like Wonder Clips). They don't poke holes in your fabric, and they have a much better grip for holding thick layers together at the seams.
Getting Your Shirts Prepped and Stabilized
This is where the magic really starts. The prep work you do now—washing, choosing, and stabilizing each shirt—is the foundation for your entire quilt. Get this part right, and you’ll turn that pile of stretchy, unruly memories into a stable, easy-to-sew canvas that will last for years.
First things first: every single shirt needs a good wash and dry before you do anything else. This is non-negotiable. It pre-shrinks the fabric and gets rid of any lingering fabric softeners or residues that could prevent the stabilizer from sticking properly. Just be sure to skip the fabric softener and dryer sheets this one last time.
The shirts you've collected are part of a huge global industry. In 2023, the shirt fabric market was valued at an incredible USD 25.8 billion, mostly thanks to the timeless appeal of cotton. You're working with quality materials from a massive textile market that's projected to hit over USD 4 trillion by 2034.
The Secret Weapon: Stabilizer
T-shirt material is knit fabric, which means it’s designed to stretch. That’s great when you're wearing it, but it’s a quilter’s nightmare. This is where fusible interfacing (often called stabilizer) comes in to save the day. Honestly, this is the single most important step in making a T-shirt quilt that doesn't look lumpy and homemade.
Applying interfacing to the back of each shirt panel completely tames the stretch, making the fabric behave just like regular quilting cotton. It stops the fabric from warping and sagging while you sew, which means your blocks will stay perfectly square and your seams will line up like a dream. I personally recommend a woven stabilizer like Pellon SF101. It adds the structure you need without making the quilt stiff, so it will still have that soft, cuddly drape.
I can't tell you how many times I've heard beginners say, "Oh, my machine can handle it, I'll just be careful." Trust me, it almost always ends in wavy seams and a distorted quilt top. Stabilizing every single shirt is the secret to getting that flat, professional finish.
How to Apply Fusible Interfacing Like a Pro
Once your shirts are clean and ironed, you’re ready for the interfacing. The goal here is a smooth, permanent bond with no bubbles or wrinkles.
Here's my go-to method for perfect results:
- Deconstruct the Shirt: Lay the shirt flat and slice up the side seams, right from the bottom hem to the armpit. Then, cut along the shoulder seams and around the collar to separate the front from the back. Now you've got two nice, flat pieces to work with.
- Cut the Interfacing: Cut a piece of your fusible interfacing so it's a little bigger than the T-shirt's graphic. Don't stress about making it perfect yet—you just need to make sure the whole design is covered.
- Position and Press: Place your T-shirt piece graphic-side down on the ironing board. Lay the interfacing on top, making sure the bumpy, adhesive side is touching the back of the shirt fabric.
- Fuse with Heat: Set your iron to the cotton setting and make sure the steam is on. Press down firmly on one spot for a solid 10-15 seconds. The key is to press, not glide. Lift the iron completely, move to the next section (overlapping a bit), and repeat until the whole piece is fused.
After you're done pressing, let the piece cool down completely right there on the ironing board. This gives the adhesive time to cure and create a really strong bond. By the way, some battings also come in fusible options, which can be a real time-saver on other projects. If you're curious, you can learn more about the pros and cons of using fusible batting for quilts.
Troubleshooting Common Prep Problems
Let's be real—not every shirt is going to cooperate perfectly. Here are a few tricks I've picked up over the years to handle the tricky ones.
- For Very Old or Thin Shirts: Some of those vintage concert tees can be paper-thin. When you're applying the interfacing, use a press cloth (a scrap piece of cotton fabric works great) between the iron and the stabilizer. It'll help protect the delicate fabric from getting scorched.
- For Graphics Bigger Than Your Block: What if a favorite design is just too big for your planned block size? You've got a couple of choices. You could design a special, larger block just for that shirt to make it a focal point. Or, you can strategically "fussy cut" the graphic, preserving the most iconic part.
- For Small Logos and Pocket Graphics: Don't toss those shirts with smaller designs! You can combine several of them into a single block. Try piecing four small logos together to create a unique "four-patch" block. It adds a ton of visual interest and makes sure no memory gets left on the cutting room floor.
Taking your time during this prep phase is what will elevate your quilt from a fun craft into a beautiful heirloom. A little patience now makes the sewing process infinitely more enjoyable and guarantees a result you’ll be proud of.
Designing Your Layout and Cutting the Blocks
Alright, you've powered through the prep work and now you have a beautiful stack of stabilized shirts. This is where the real artistry begins—you're moving from a pile of laundry to a canvas of memories. Now we get to decide how your quilt will tell its story.
First things first, let's talk block size. If you're going for a classic grid-style quilt, sticking to one uniform size is the simplest and cleanest approach. My go-to recommendation is a 15-inch finished block, which means you'll be cutting your squares at 15.5 inches. This size is wonderfully versatile and gives most T-shirt graphics plenty of breathing room.
Before you even think about picking up your rotary cutter, lay all your stabilized shirts out on the floor or a big table. Stand back and just look. What colors jump out at you? Are there a few really dark shirts that need to be spread out? This bird's-eye view is so important for creating a layout that looks thoughtful and balanced, not just thrown together.
The Art of the Fussy Cut
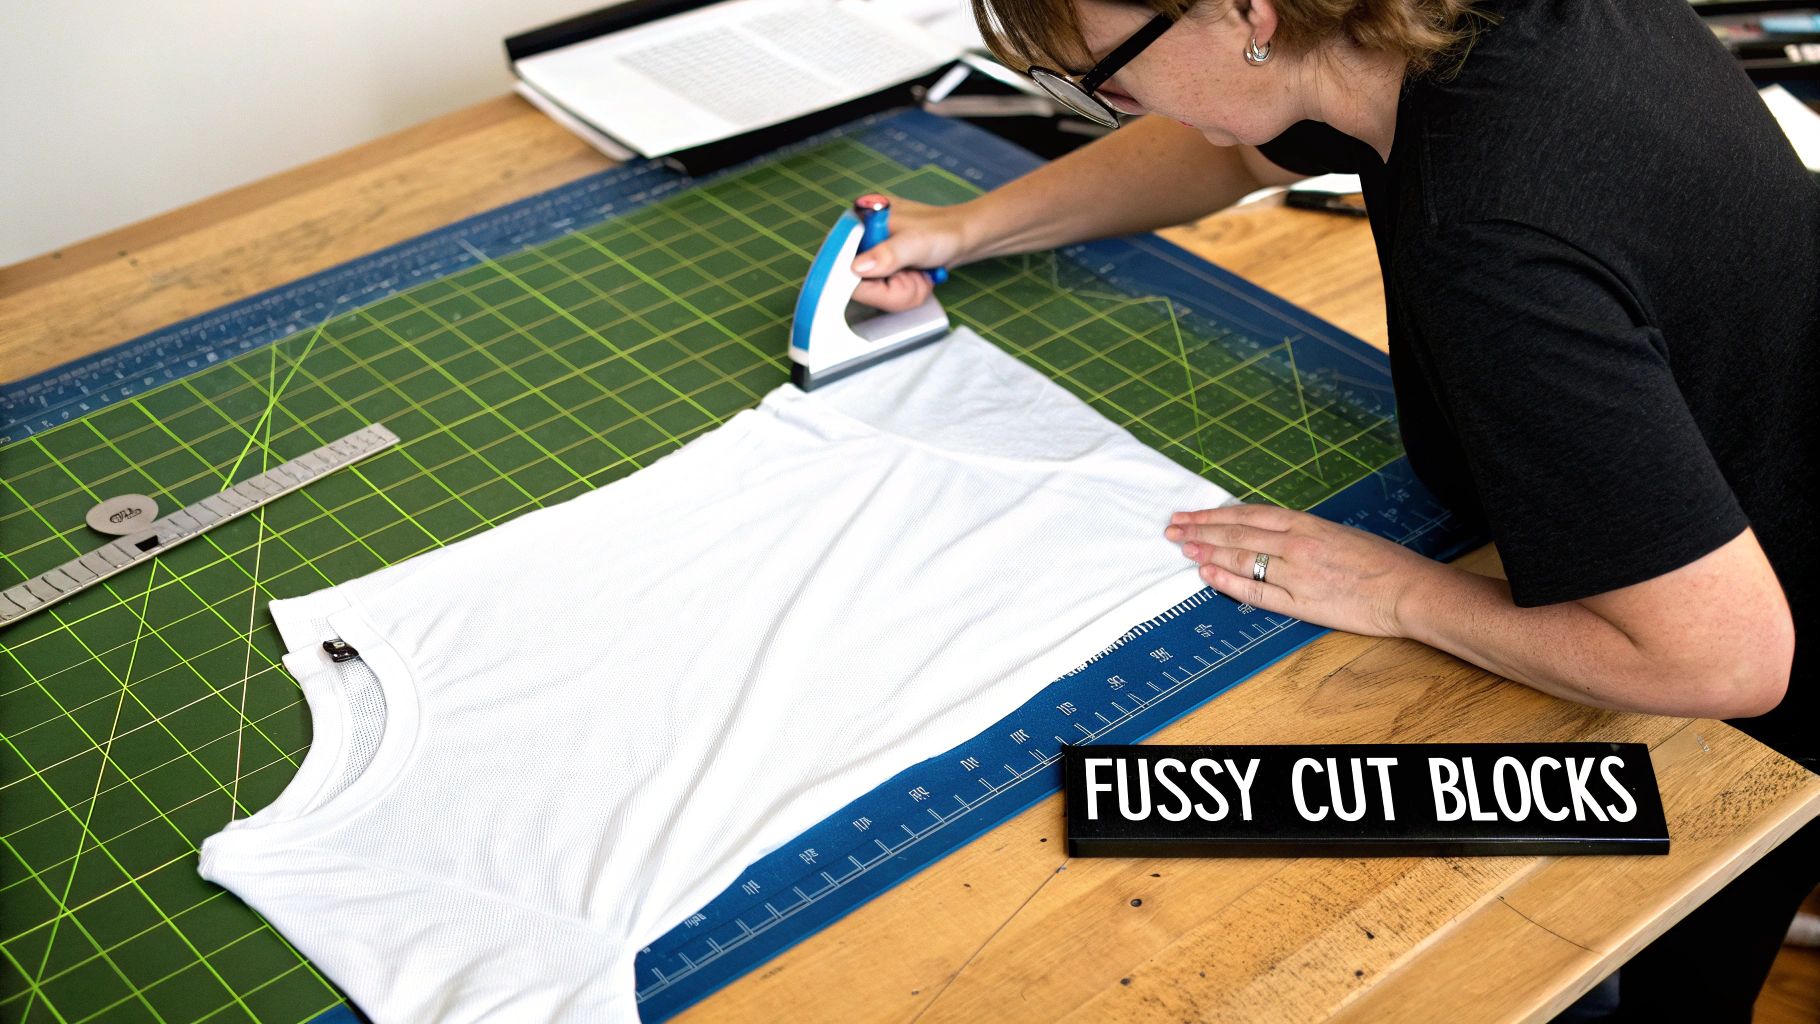
You’ll hear quilters talk about fussy cutting, and for a T-shirt quilt, it’s everything. All it means is carefully centering a specific design within your square before you cut. You’re not just hacking up fabric; you're framing a memory. The whole point is to make that concert logo or marathon graphic the star of its block.
Grab a square acrylic ruler that matches your cut size—in our case, a 15.5" x 15.5" ruler. Lay it over the shirt’s graphic and slide it around until the design looks perfectly centered. This is your chance to crop out a weird stain on the side or an empty bit of space above a logo.
Once you’ve got it just right, press down firmly on that ruler and use your rotary cutter to slice cleanly along all four sides. This simple technique is the secret to getting those perfectly framed, professional-looking blocks.
Planning Your Quilt Layout
Now for the really fun part! Once all your blocks are cut, spread them out on the floor again. This is your first look at the quilt top, and it’s the best time to play around.
- Balance Your Colors: Try to avoid putting all the navy blue shirts in one corner. Scatter them throughout the layout to create a nice, even flow.
- Mix "Busy" and "Quiet" Blocks: Have a shirt with a huge, wild graphic? Try placing it next to one with just a simple pocket logo. This contrast gives the eye a place to rest and helps each shirt stand out on its own.
- Watch for Direction: If you have graphics with text, make sure they’re all facing the right way up! It’s a small detail that’s easy to miss until it’s too late.
Take a picture of your layout with your phone! It's amazing how looking at it on a small screen can instantly show you where the colors are clumping or if a block feels out of place. Step away for an hour, grab a cup of coffee, and come back with fresh eyes before you commit.
Want to Level Up? Add Sashing and Cornerstones
You can absolutely sew your blocks directly to one another, but if you want to give your quilt a more polished, structured look, consider adding sashing. Sashing is simply the fabric strips that go between your blocks, creating a visual grid.
So, why bother with the extra step?
- It Ties Everything Together: A single sashing color acts like a frame, making a wild collection of T-shirts look like a cohesive, intentional design.
- It’s More Forgiving: Let’s be honest, not all our blocks will be perfectly square. Sashing provides a buffer that makes it much easier to line things up, hiding any minor imperfections.
- It Makes Your Quilt Bigger: Adding 2-inch sashing strips can add significant size to your quilt without you having to hunt down more T-shirts.
Cornerstones are the little squares of fabric that sit at the intersections of your sashing. They’re a fantastic spot to add a pop of contrasting color and, believe it or not, they make lining up your rows so much easier. Framing each memory with sashing and cornerstones takes your quilt from a simple project to a true keepsake.
Choosing the Perfect Batting and Backing
You’ve done the hard work of piecing all those memories together. Now it's time for the final touches that turn your quilt top into a cozy, functional blanket that will be loved for years. Choosing the right batting and backing is what makes that happen.
Think of the batting as the heart of your quilt. This middle layer determines the final weight, warmth, and how the quilt drapes. For a T-shirt quilt that’s going to be snuggled with and washed often, you’ve got a few fantastic options.
What to Look for in Quilt Batting
The most important term to know here is loft—it's simply how thick and dense the batting is. Since your T-shirt blocks are already pretty thick thanks to the stabilizer, a low-loft batting is almost always your best bet. This keeps the quilt from feeling stiff or ridiculously heavy.
Here are the go-to choices for T-shirt quilts:
- 100% Cotton Batting: A true classic. It's breathable, soft, and gives you that wonderful, slightly crinkled look after the first wash. It just makes a quilt feel vintage and well-loved right from the start.
- Polyester Batting: This is a great pick if you want a lightweight but still very warm quilt. Polyester batting holds its shape beautifully through countless washes and is less prone to shrinking than all-cotton options.
- 80/20 Cotton-Poly Blend: Honestly, this is my personal favorite for T-shirt quilts. It’s the perfect workhorse, giving you the best of both worlds—the soft, natural feel of cotton with the durability and stability of polyester. It’s a dream to work with.
Standing in the batting aisle can feel overwhelming. My advice? Stick with a trusted brand like Hobbs or Pellon and grab an 80/20 blend for your first T-shirt quilt. It’s incredibly forgiving and delivers a beautiful, reliable result every single time.
If you want to really get into the weeds on all the options, our complete guide to selecting the best batting for a T-shirt quilt is a great resource.
When choosing your batting, it's helpful to compare the materials side-by-side to see how their characteristics align with your project goals.
Batting Type Comparison for T-Shirt Quilts
| Batting Material | Key Characteristics | Best For | Quilting Distance |
|---|---|---|---|
| 100% Cotton | Soft, breathable, low-loft. Creates a classic, puckered look after washing. Can be heavy. | Quilters seeking a traditional, heirloom feel. Best for quilts that won't be moved around constantly. | Up to 8-10 inches apart. |
| Polyester | Lightweight, warm, durable, and resists shrinkage. Can have a higher loft. | Everyday quilts that need to withstand frequent washing and retain their shape and warmth. | Can be quilted widely, often up to 10 inches. |
| 80/20 Cotton/Poly Blend | The "best of both" option. Softness of cotton with the stability and lower shrinkage of poly. Drapes well. | Versatile projects, especially for beginners. The go-to for durable, cozy T-shirt quilts. | Typically up to 8 inches apart. |
Ultimately, an 80/20 blend is a fantastic starting point for its balance of softness and durability, making it perfect for a quilt designed for heavy use.
Finding the Right Backing Fabric
Finally, let's pick the fabric that will go right up against your skin. The backing is your chance to inject even more personality and comfort into your quilt.
Your two main choices here are quilting cotton or flannel. Simple as that.
- Quilting Cotton: It comes in an endless sea of colors and prints, so finding something that perfectly complements the shirts on the front is a breeze. It’s crisp, durable, and generally easy to handle.
- Flannel: If maximum coziness is the goal, you just can't beat flannel. It’s incredibly soft and warm, instantly turning your T-shirt quilt into the ultimate snuggle magnet. Just be absolutely sure to pre-wash it, as flannel is notorious for shrinking!
So, what color or pattern should you choose? Look at your quilt top. A solid, neutral color can create a calm backdrop that lets the busy T-shirt graphics shine. Or, a fun, coordinating print can add a playful surprise on the back. This is where you build a quilt that doesn't just look good, but feels absolutely incredible.
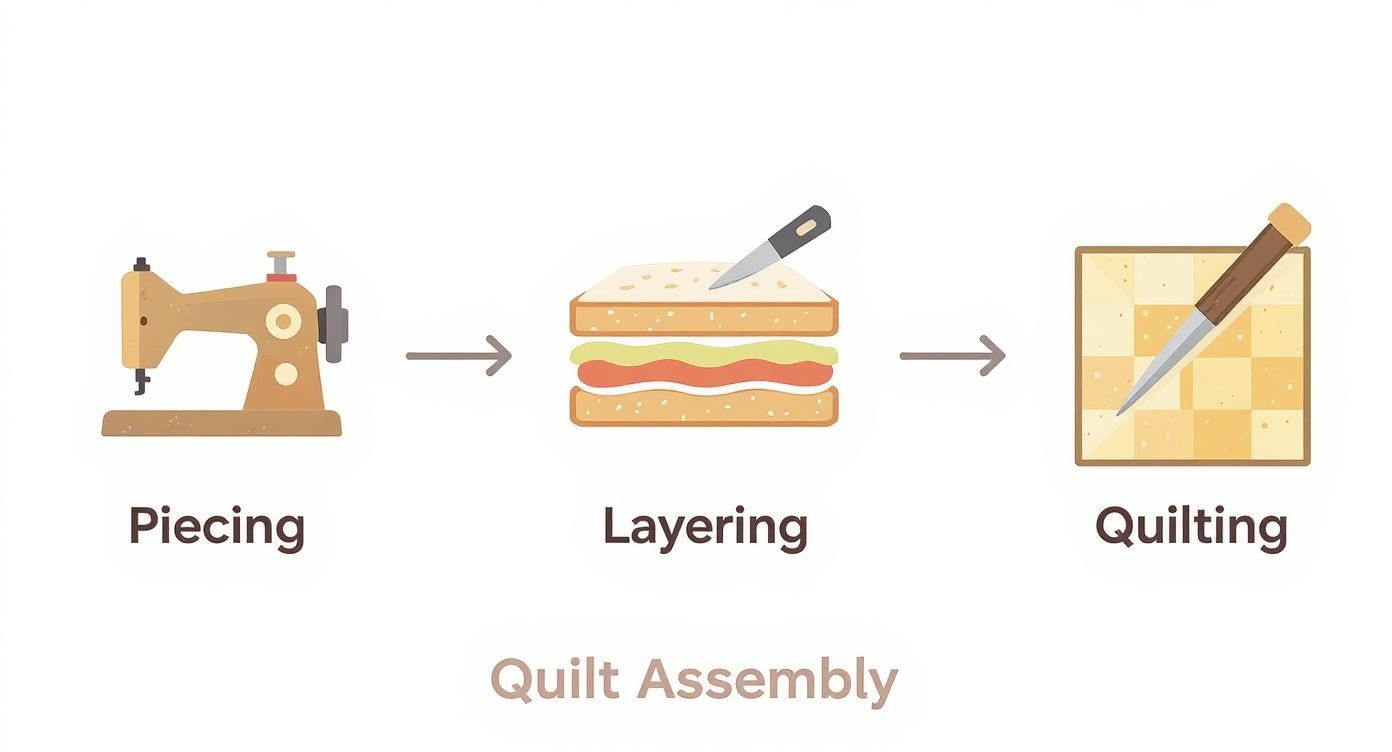
Assembling and Quilting Your Masterpiece
Alright, this is the moment of truth. All that careful prep work—stabilizing, cutting, and arranging—has brought you to this point. You're about to turn that neat stack of T-shirt blocks into an actual quilt top.
If there’s one non-negotiable rule that separates a beautiful, flat quilt from a wavy, frustrating one, it’s this: mastering the scant quarter-inch seam allowance. It’s everything. This tiny detail is what makes your blocks fit together perfectly, keeps your corners crisp, and ensures the finished quilt lies flat.
Most modern machines come with a special quarter-inch foot, which is a lifesaver. But if yours doesn’t, don't worry. A simple piece of painter’s tape lined up on your machine's throat plate works just as well as a reliable sewing guide.
Piecing Your Quilt Top Like a Pro
The fastest way to stitch this all together is by working in rows. You'll take the blocks from your first horizontal row and sew them together one by one. But here's the trick: use a technique called chain piecing.
Instead of sewing two blocks, stopping, cutting the thread, and then starting on the next pair, you just keep feeding them through. As one pair finishes, guide the next pair right up to the needle without breaking the thread. You'll end up with a long "chain" of connected blocks.
Why bother?
- It saves an incredible amount of thread.
- It seriously speeds up the whole piecing process.
- It’s a fantastic way to keep your rows organized and prevent mix-ups.
Once a row is pieced, it's time to press the seams. Here’s a game-changing tip: press the seams in alternating directions for each row. For Row 1, press all the seams to the right. For Row 2, press them all to the left. When you go to sew the rows together, those seams will "nest" or lock into each other perfectly, giving you those sharp, professional-looking corners we all crave.
Building the Quilt Sandwich
With your quilt top looking gorgeous, it’s time to build the "quilt sandwich." This is where it officially becomes a quilt, with three distinct layers: your backing fabric, the batting in the middle, and your pieced top.
Find a large, clean floor space to work on. Lay your backing fabric down first, wrong side facing up. Use painter's tape to secure the edges, pulling it taut but being careful not to stretch it out of shape. Next, lay your batting smoothly over the backing, and finally, place your quilt top on the very top, right side up.
Take your time with this. The goal is to get all three layers perfectly smooth and free of wrinkles. Any bunching or bumps you leave now will be permanently stitched into your quilt, so it's worth the extra few minutes to get it right.
Now, you need to hold these layers together for quilting. This is called basting, and it’s a crucial step to prevent everything from shifting around while you sew. There are a few different ways to do this, and you can get the full rundown in our guide on how to baste a quilt.
The Final Step: Quilting
This is it—the final stage where you add the stitching that runs through all three layers. The quilting is what gives the project its texture and durability. For a T-shirt quilt, which is already a bit bulky, simple and clean quilting designs almost always look the best.
Here are two great, beginner-friendly options:
- Stitching in the Ditch: This is exactly what it sounds like—you quilt directly in the seam lines (the "ditch") between your T-shirt blocks. It creates a subtle grid texture that secures the layers without competing with the shirt graphics.
- Simple Straight Lines: Using a walking foot on your home machine, you can stitch straight lines across the quilt. You can go diagonally through the blocks or run lines on either side of the seams for a clean, modern finish.
You’re not just making a blanket; you're taking part in a massive global craft. The quilt market was valued at around USD 5.32 billion in 2024 and is projected to hit nearly USD 9.26 billion by 2034. With an estimated 9 to 11 million quilters in North America alone, you're in great company! You can dive deeper into these global quilting market trends if you're curious.
Of course, if you're feeling ambitious or just don't want to wrestle a big quilt through your machine, sending it to a professional with a longarm quilting machine is a fantastic choice. They can add stunning, intricate patterns that give your T-shirt quilt a truly heirloom-quality finish.
Finishing Your Quilt with Perfect Binding
You’re on the home stretch! Binding is that final, satisfying step that pulls everything together, framing your work like a piece of art. It’s what transforms your project from a flimsy top into a durable, finished quilt that can stand up to years of cuddles and trips through the washing machine.
Don't let this last part feel daunting. Think of it as the victory lap after the marathon of piecing, layering, and quilting you just completed. With a few pro tricks, you’ll get a clean, professional finish you can be proud of.
As you can see, every step builds on the last—from piecing your T-shirt blocks to layering the quilt sandwich and quilting it all together. Binding is the grand finale.
Calculating and Preparing Your Binding
First things first, let's figure out how much fabric you’ll need for the binding. Just measure the perimeter of your quilt (all four sides added together) and toss in an extra 15-20 inches for good measure. Trust me, you'll be glad to have that little bit of extra fabric when it's time to join the ends.
For T-shirt quilts, I swear by 2.5-inch wide binding strips. This width is the sweet spot—it’s wide enough to comfortably wrap around the bulky layers of your quilt sandwich but not so wide that it looks clunky.
- Cut your 2.5-inch strips across the width of the fabric (WOF), from selvage to selvage.
- Sew the strips together end-to-end using a diagonal seam to reduce bulk. This creates one long, continuous strip.
- Press the seams open.
My Go-To Tip: Once your long strip is ready, press it in half lengthwise, wrong sides together. This one simple step creates a perfect, crisp fold that makes attaching the binding so much easier and more accurate.
Attaching the Binding by Machine
Because T-shirt quilts are meant to be used and loved, a fully machine-stitched binding is the way to go for maximum durability. It’s strong and fast.
Start by lining up the raw edges of your folded binding strip with the raw edge of your quilt top. Leave a free "tail" of about 8-10 inches before you start sewing—you'll need this later to neatly join the ends.
Begin stitching with a quarter-inch seam allowance.
Creating Perfect Mitered Corners
The secret to those sharp, professional-looking corners is all in the miter. It’s easier than it looks!
Sew down the first side, but stop a perfect quarter-inch from the corner. Backstitch, then snip your threads and pull the quilt away from the machine.
Now, take your binding strip and fold it straight up, away from the quilt, which creates a 45-degree angle. Hold that fold with your finger, then fold the binding strip straight back down so it lines up with the next edge of the quilt. You'll have a neat little triangle of fabric tucked in at the corner.
Start sewing again right from the top edge of this new side. Just repeat this fold-and-sew process for all four corners.
When you’ve made it all the way around, stop sewing, leaving another long tail. Overlap the two tails, trim them so they can be joined with a final diagonal seam, and stitch them together. Finish sewing the last little un-sewn section of binding to the quilt.
The final step is to wrap the folded edge of the binding around to the back of the quilt. It should just barely cover your first line of stitching. I love using Wonder Clips to hold everything perfectly in place. Then, from the front of the quilt, stitch "in the ditch"—right in the seam where the binding meets the quilt top. This will catch the folded edge of the binding on the back, securing it with a nearly invisible stitch for a tough, beautiful finish.
Common Questions I Hear About T-Shirt Quilts
Even with the best plan, every quilting project has its little quirks. When you're making a t-shirt quilt for the first time, questions are bound to pop up. Honestly, that’s a good sign! It means you’re paying attention to the details that matter.
Here are some of the most common questions I get from new t-shirt quilters. I've pulled together some straightforward answers to help you navigate those little roadblocks and keep moving forward with confidence.
How Many T-Shirts Do I Really Need?
This is always the first question, and the true answer is… it depends! The number of shirts you'll need is completely tied to the final size of your quilt and the size of your blocks.
As a starting point, let's look at a classic throw-sized quilt, which usually lands around 50" x 65". If you’re making standard 14-inch finished blocks, you'll need about 20 shirts to fill that space. Thinking bigger, like a queen-sized quilt? You'll want to have somewhere between 30 and 40 shirts ready to go.
My best advice is to always work backward. Figure out your final quilt dimensions and block size first, then do the math. I also make it a rule to have at least two or three extra shirts on hand. It's a total lifesaver when a cutting mistake happens or a graphic just won't center up quite right.
Can I Mix In Sweatshirts or Jerseys?
Yes, absolutely! In fact, mixing different types of shirts often adds a wonderful texture and helps tell a richer story. The secret isn’t about using the exact same fabric for every block, but about making every fabric behave like it's the same.
The magic, as always, is in the stabilizer.
- Thick Sweatshirts: These usually have less stretch than a t-shirt, so a lightweight fusible interfacing is all you need to give them structure without adding a ton of bulk.
- Mesh Jerseys: These can be a little tricky because of all the holes. The trick is to apply a solid piece of interfacing to the entire back of the graphic area. This effectively turns that holey mesh into a solid, stable piece of fabric that won’t stretch or get distorted while you sew.
Your goal is to get every single block—no matter what it started as—to feel and act like regular quilting cotton before you start sewing them together.
What Is the Safest Way to Wash My Finished Quilt?
After putting so much love and effort into your quilt, you want to make sure it lasts. A gentle washing routine is the best way to protect it for years to come.
Always wash your quilt in cold water on a gentle or delicate cycle. I recommend using a mild detergent, something without harsh chemicals or heavy perfumes. For the first couple of washes, it's a smart move to toss in a "color catcher" sheet. These little sheets are amazing at grabbing any loose dyes from your backing or sashing fabrics, preventing them from bleeding onto your precious shirt blocks.
When it's time to dry, low heat is your best friend. Tumble dry on the lowest setting your machine has. High heat is the ultimate enemy of t-shirt quilts; it can crack the screen-printed graphics and cause certain battings to shrink or get lumpy.
If you want the absolute safest method, lay the quilt flat to air dry. Some batting materials, especially those with scrim, have extra stability that helps them hold up beautifully to washing. You can learn more about what is scrim in batting to see if that's a good choice for your project.
At Quilt Batting, we believe the right foundation makes all the difference. Find the perfect batting for your t-shirt quilt, from durable 80/20 blends to soft 100% cotton, available by the roll to fuel all your creative projects. Start your next masterpiece with premium supplies from https://quiltbatting.shop.