

Welcome to quilting! It’s such a rewarding craft, and I'm excited you're starting this journey. If there's one piece of advice I can give any new quilter, it's this: focus on getting the fundamentals right from the very beginning. Everything boils down to using the right tools, nailing that perfect quarter-inch seam, and pressing everything flat and crisp.
Seriously, if you can master those three things—accurate cutting, consistent sewing, and proper pressing—you’ll sidestep nearly all the common frustrations that trip people up. Get these down, and your first project will be something you're incredibly proud of.
Building Your Essential Quilting Toolkit
Before you even think about fabric, let's talk tools. Getting the right gear is your most important first step, and I'm not just handing you a shopping list. I want you to understand why these specific items are absolute game-changers for getting clean, professional-looking results. Think of this as the foundation. With the right tools, every other step just clicks into place.
And you’re in good company! The quilting world is buzzing with new faces. Recent stats show that about 18% of quilters are brand new to the craft, which is a huge jump from just 11% the year before. That means more support, more resources, and a whole lot of shared excitement for newcomers like you.
The Non-Negotiable Cutting Tools
A beautiful quilt starts with a perfect cut. It’s that simple. Wobbly, inaccurate cuts are a recipe for mismatched seams and a whole lot of frustration down the line. To avoid that headache, you really need these three things:
- A Rotary Cutter: This is your best friend. It looks like a pizza cutter but for fabric, and it's infinitely more accurate than scissors. A sharp 45mm blade is the go-to standard for a reason—it’s versatile, easy to control, and gets the job done.
- A Self-Healing Cutting Mat: This is the other half of your cutting duo. The mat protects your table, but more importantly, it keeps your rotary blade from dulling instantly. A 24" x 36" mat is a fantastic size to start with; it gives you plenty of room to work without being overwhelming.
- Acrylic Rulers: You can’t eyeball this stuff. You'll want at least one long ruler, like a 6" x 24", for cutting strips straight from the bolt. A smaller square ruler is also incredibly handy for trimming up your finished blocks. Just make sure you can read the markings clearly!
If I can offer one piece of personal advice, it's this: don't cheap out on your cutting tools. A quality rotary cutter and a good mat might feel like a big purchase upfront, but they are the difference between enjoying the process and wanting to tear your hair out. They are the true workhorses of any quilting space.
Choosing Your First Fabrics
Now for the fun part—the fabric! The feel of crisp cotton is where the real joy of quilting begins. My rule for anyone just starting out is simple: stick with 100% quilting cotton. It behaves beautifully, it's stable, it presses like a dream, and it doesn’t stretch all over the place, which makes it incredibly forgiving.
Want to make things even easier on yourself? Start with a pre-cut fabric bundle. Grabbing a "charm pack" (a stack of 5-inch squares) or a "jelly roll" (a roll of 2.5-inch strips) lets you skip the intimidating first step of cutting down yards of fabric. You can just open the package and get straight to the sewing machine.
There are so many stunning and precise patterns that can be made using the various quilting templates designed to work perfectly with these pre-cuts.
Choosing The Perfect Batting For Your Quilt
Let's talk about the unsung hero of your quilt: the batting. This is the cozy middle layer that gives your quilt its warmth, its texture, and its lovely weight. It’s what turns your beautiful pieced top into a real, functional work of art.
For anyone new to quilting, the sheer number of batting options can feel a little overwhelming. But trust me, making the right choice here is what truly defines the final look and feel of your project. The most important thing to look at is the fiber content, because each material has its own personality.
Getting to Know Your Batting Materials
You'll mostly find cotton, polyester, wool, and various blends on the shelves. Cotton batting is a classic for a reason. It's breathable and gives you that traditional, flat drape that just gets softer and crinklier with every wash—perfect for a quilt that’s going to be loved and used a lot.
Polyester is all about the loft, which is just a fancy word for thickness. If you want that puffy, comforter-like look, a high-loft polyester is your best friend. It’s surprisingly lightweight but incredibly warm, making it a fantastic choice for a bed quilt where you want maximum coziness without feeling weighed down.
Then there's wool, which offers incredible warmth and a wonderful springiness that helps it resist creasing. Blends are also a hugely popular choice. An 80% cotton and 20% polyester mix, for example, gives you the soft, natural feel of cotton with the durability and loft of polyester. It’s a fantastic all-rounder. If you want to get into the nitty-gritty, exploring different types of quilt batting can help you find that perfect match.
Don’t just grab the first roll you see. Think about where your quilt will live. Is it a modern wall hanging? A thin, low-loft cotton will help it lie perfectly flat. Is it a lap quilt for the couch? A sturdy cotton-poly blend will stand up to daily use and frequent washing.
To make this a little easier, here’s a quick comparison of the most common batting materials to help you choose the best option for your first quilting project.
Beginner's Guide to Quilt Batting Types
| Batting Type | Best For | Key Characteristics | Beginner Tip |
|---|---|---|---|
| 100% Cotton | Traditional quilts, baby quilts, wall hangings | Soft, breathable, low loft, gets softer with use | Pre-washing can prevent future shrinkage. Great for achieving a classic, crinkly look. |
| 100% Polyester | Bed quilts, tied quilts, puffy comforters | High loft, lightweight, warm, resists mold/mildew | Very forgiving and easy to work with. The high loft can hide quilting imperfections. |
| Wool | Heirlooms, bed quilts for cold climates | Exceptionally warm, breathable, resists creasing | A bit pricier, but its warmth-to-weight ratio is unmatched. Wonderful for hand quilting. |
| Cotton/Poly Blend | Everyday use quilts, lap quilts, charity projects | Durable, low-to-mid loft, minimal shrinkage | The best of both worlds! This is a reliable and versatile choice for almost any project. |
Choosing a batting that fits your project's needs is a simple step that makes a huge difference in the final product.
Decoding The Batting Package
When you pick up a roll of batting, you’ll see terms like "loft" and "drape." These aren't just industry jargon; they’re your clues to how the finished quilt will look and feel.
- Loft: This is all about the thickness. A low-loft batting is thin and creates a flatter, more traditional quilt. A high-loft batting is much thicker, resulting in a puffier look that makes your quilting stitches really pop.
- Drape: This simply describes how the quilt hangs and folds. Batting with a good drape, like cotton or wool, creates a quilt that feels soft and flexible. Stiffer battings will make for a less pliable quilt.
Learning to choose your batting with intention is one of the most valuable tips a new quilter can learn. It’s what elevates your project from a simple pieced top to a thoughtfully constructed textile you can be proud of.
Of course, the batting works hand-in-hand with your other essential tools to bring your vision to life.
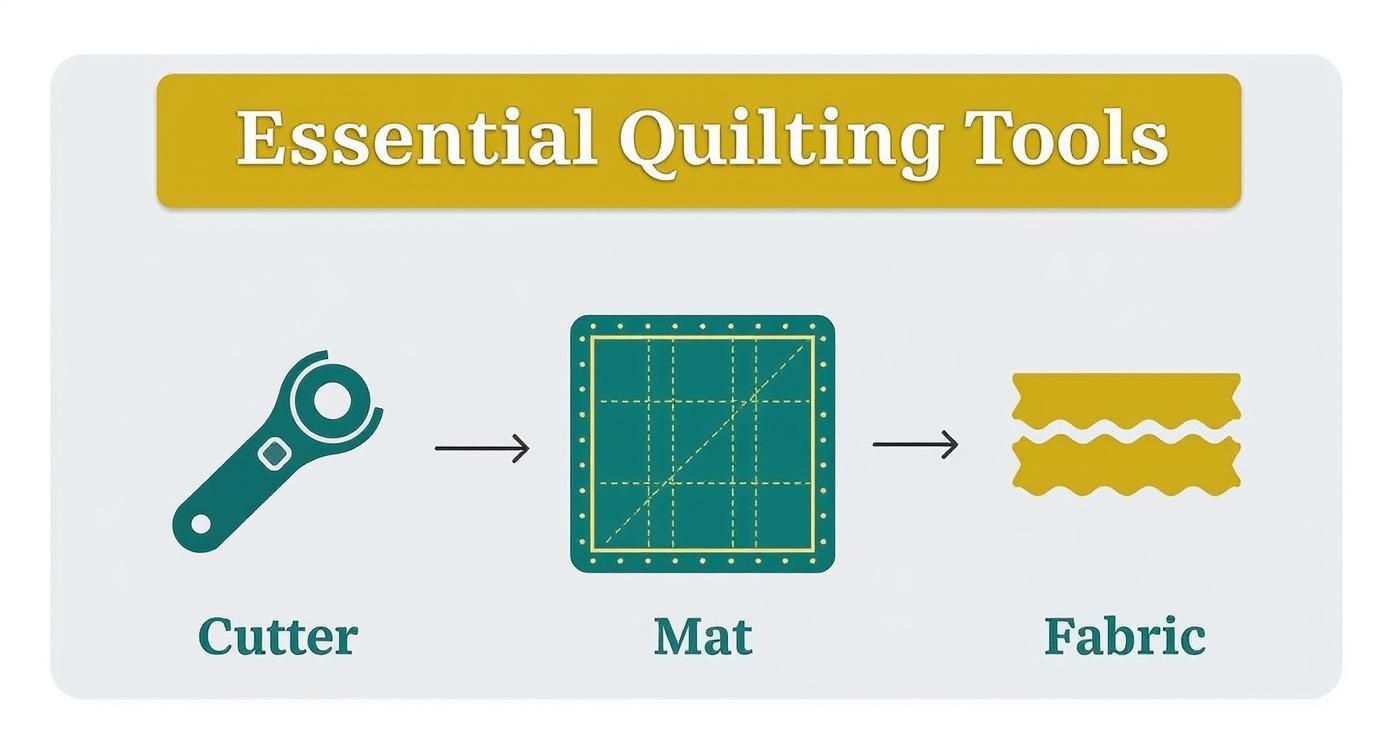
This trio—the cutter, mat, and fabric—is the foundation for the precision and creativity that quilting is all about.
Getting Your Cuts and Seams Just Right
You know those breathtaking quilts where every point meets perfectly and the whole thing lies beautifully flat? That’s not magic. It’s precision. Getting your cutting and sewing right from the very beginning is probably the single most important thing you can do as a new quilter. Every little bit of accuracy adds up.
Think about it—if you're off by just 1/16th of an inch on a single cut, that error gets multiplied with every piece you add. Before you know it, your whole quilt block is wonky. Consistency is the name of the game here.
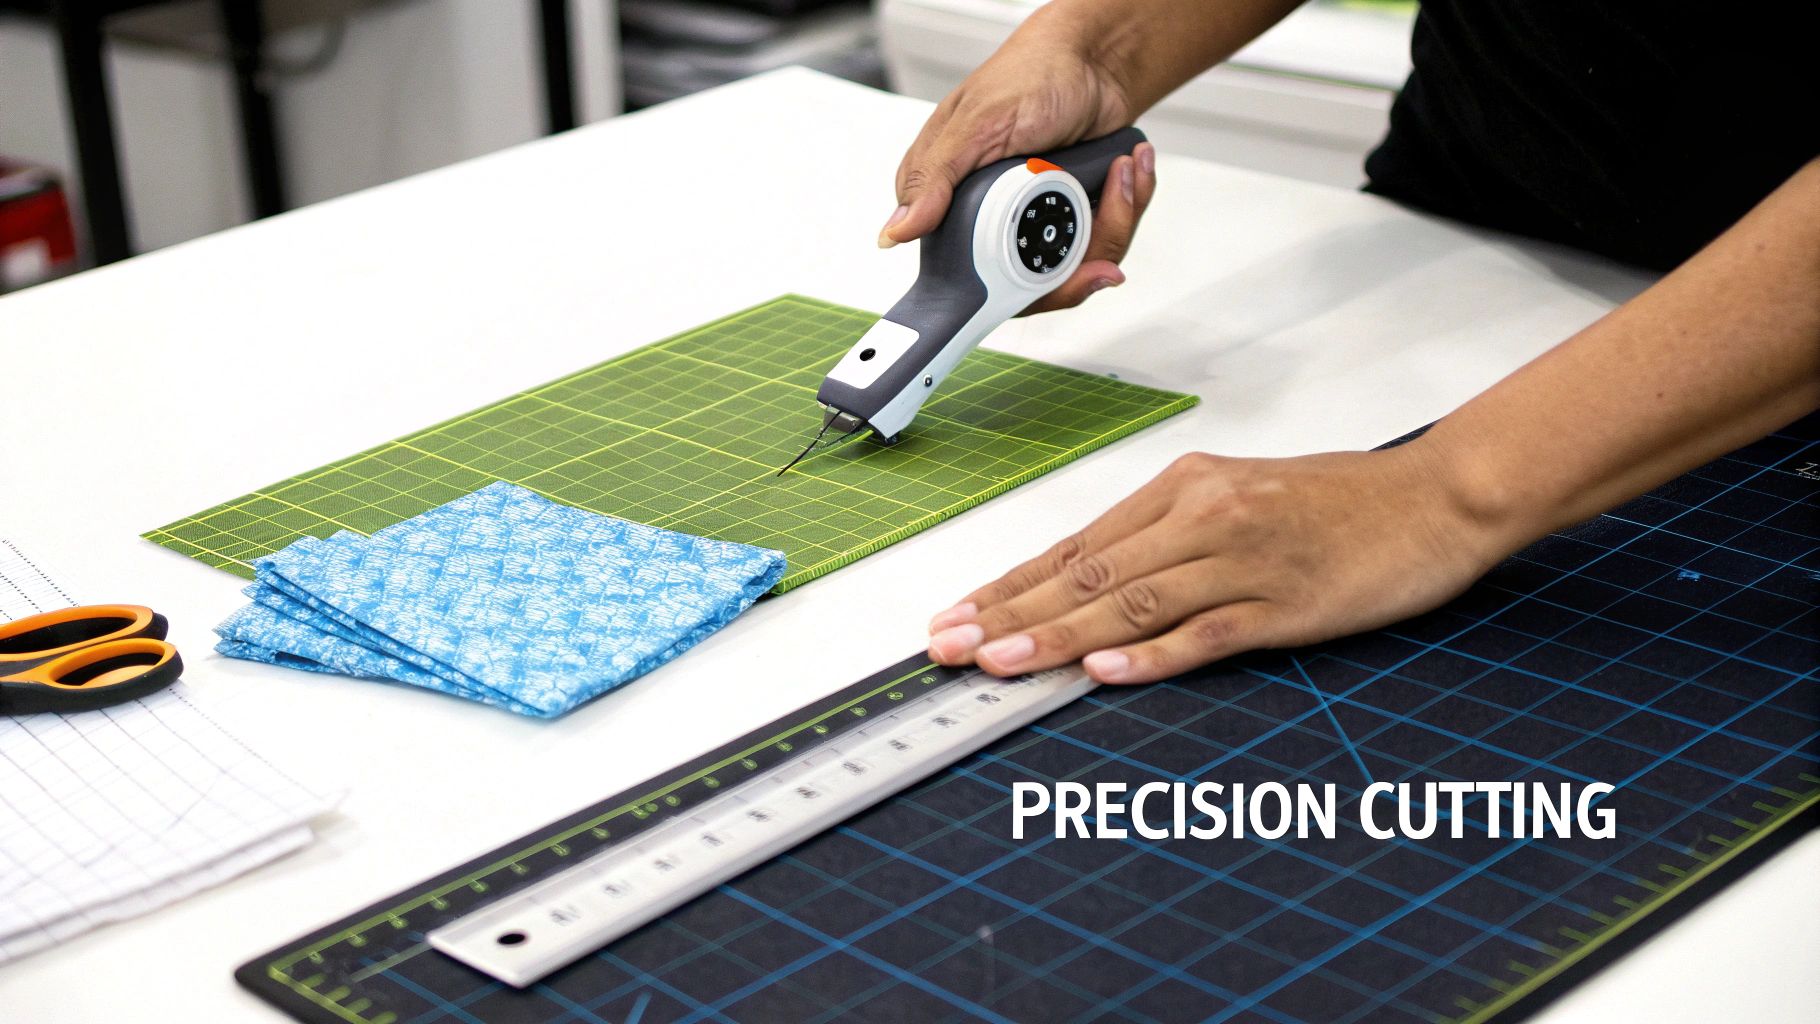
How to Get a Perfect Cut, Every Single Time
Your path to a perfect cut actually starts before your blade even hits the fabric. First things first, you need to "square up" your fabric. This just means creating one perfectly straight edge that you can measure everything else from.
Fold your fabric in half, lining up the finished selvage edges. Lay it on your cutting mat and use your ruler to trim off that messy, uneven raw edge, creating a crisp 90-degree angle. Now you have a reliable starting point.
When you're ready to cut your strips or squares, always stand up. It gives you much better leverage and a clearer view. Plant your non-dominant hand firmly on the ruler, spreading your fingers out to hold it steady. Press down and glide the rotary cutter away from your body in one smooth motion.
My big "aha!" moment with cutting was learning to trust my ruler over my mat. The lines on a good quilting ruler are far more accurate than the grid on a cutting mat. Always use the ruler's markings for your measurements; the mat is just there to give you a general guide and protect your table.
The All-Important Quarter-Inch Seam
If precise cutting is the foundation, the quarter-inch seam allowance is the framework that holds your quilt together. Seriously, every single quilt pattern is designed around a perfect 1/4" seam. Getting this right isn't optional—it's everything.
Please, don't just eyeball it! The easiest way to nail this is with a quarter-inch presser foot for your sewing machine. It has a little metal guide on the edge that your fabric just bumps up against, keeping your seam perfectly straight and exactly the right width. It was a total game-changer for me.
No special foot? No problem. You can make your own guide. Just stack a few sticky notes or place a strip of painter's tape on your machine exactly 1/4" to the right of your needle.
Work Smarter (and Faster) with Chain Piecing
Once you've got that seam allowance down, you're ready for a technique that will blow your mind with how much time and thread it saves: chain piecing.
Instead of sewing two pieces together, cutting the thread, and starting over, you just feed the next pair of fabric pieces through the machine one after another without stopping.
You’ll end up with a long "chain" of little blocks connected by thread, which you can just snip apart when you're done. This method is brilliant for a few reasons:
- You'll save a shocking amount of thread.
- It cuts down your sewing time dramatically.
- It helps keep your seams consistent because you get into a steady rhythm.
Let's say you're making a simple nine-patch block. You can chain piece all the pairs for your rows, press them, and then chain piece the finished rows together. It's an incredibly efficient way to work that keeps everything organized and your seams looking fantastic. It proves that sometimes the best shortcut is just good technique.
Bringing It All Together: Assembling and Quilting Your Masterpiece
This is it—the moment your carefully pieced top, fluffy batting, and sturdy backing finally come together. We call this the "quilt sandwich," and getting it right is one of the most crucial steps in the entire process. A well-basted quilt is an absolute dream to work with, but a sloppy one? It'll fight you every inch of the way.
It's stages like this that show you why quilting has become such a beloved craft worldwide. The global quilt market hit about USD 5.32 billion in 2024, and it's only growing. That’s a testament to how many people are falling in love with this art form, which is great news for you—it means there's a huge community and tons of resources to help you succeed. You can see the full research on the expanding quilt market to get a sense of just how big this hobby is.
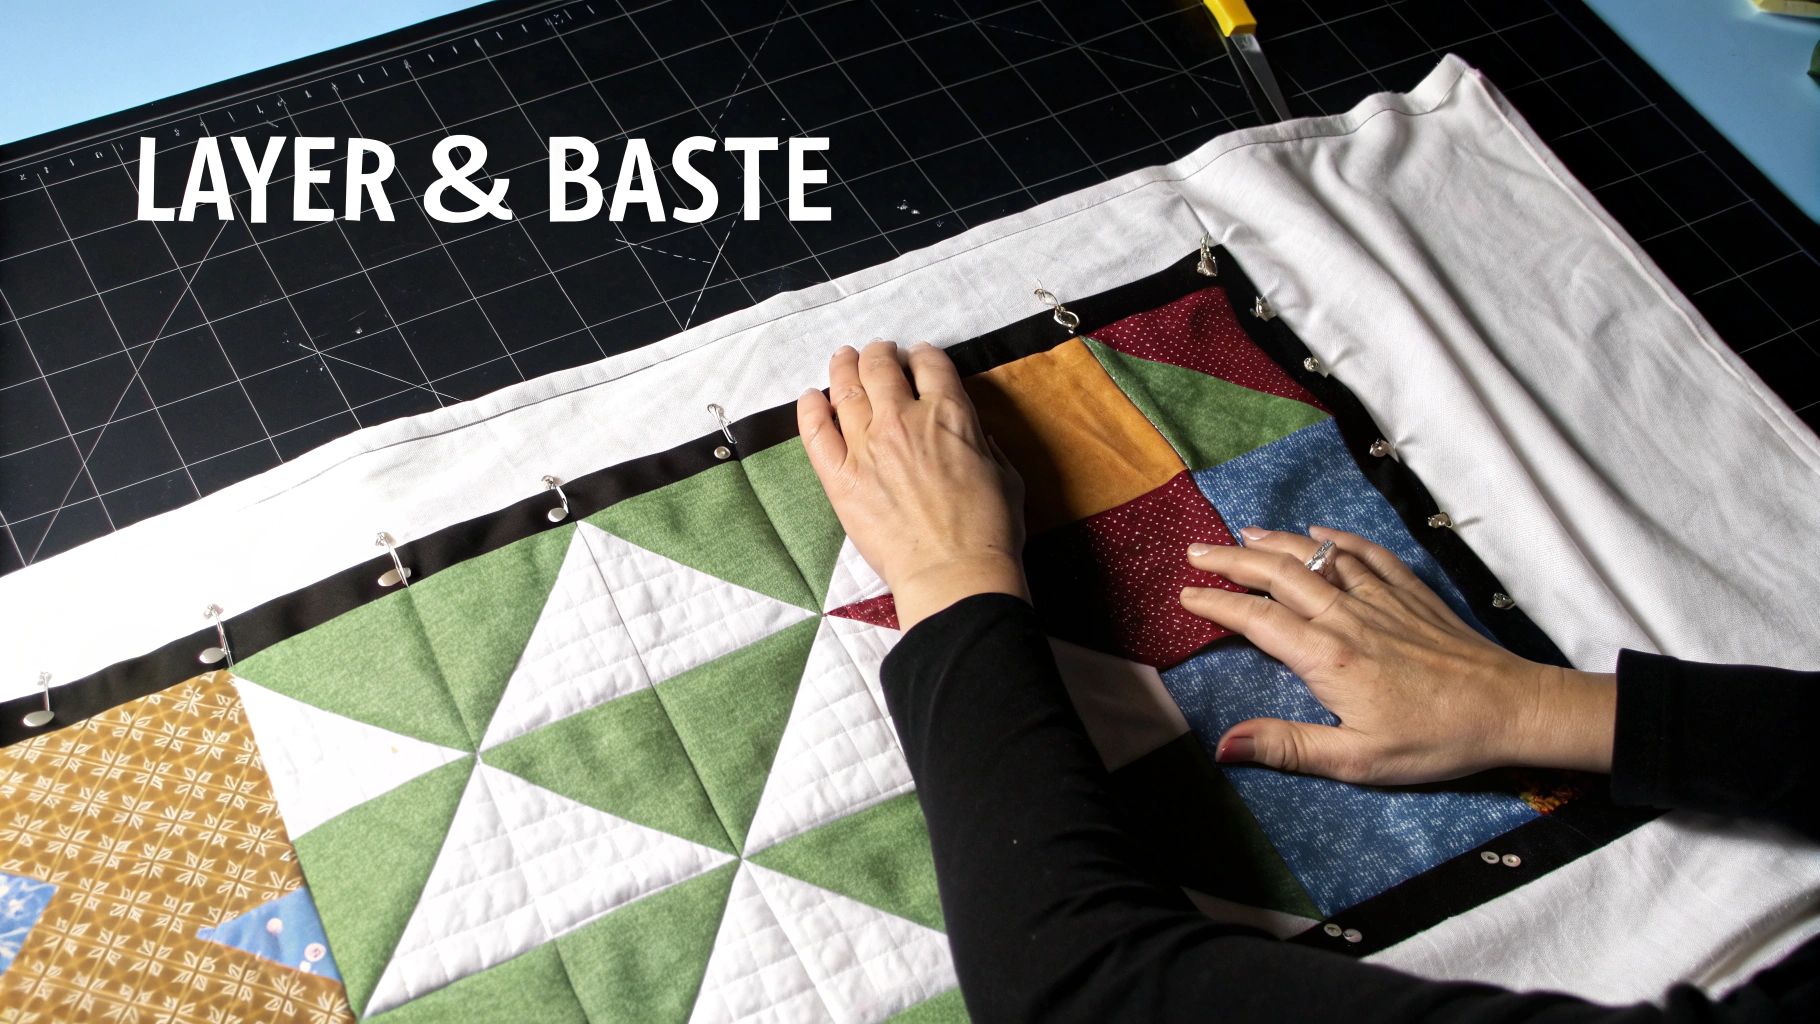
The Art of a Wrinkle-Free Baste
Basting is just a temporary way to hold your three layers together while you do the permanent stitching. The whole point is to stop anything from shifting, puckering, or bunching up. There are two main ways quilters tackle this.
- Pin Basting: This is the old-school method, and it works great. You'll use special curved safety pins (so much easier on your fingers!) and place one every few inches all over the quilt.
- Spray Basting: For a much faster approach, you can use a temporary spray adhesive. A light mist between each layer holds everything in place beautifully, and it washes right out when you're done.
Honestly, for beginners, I almost always recommend spray basting. It dramatically cuts down on the chances of getting those tiny, frustrating puckers that can form between pins. Just make sure you work in a well-ventilated room and put down some newspaper to protect your floors! For a really deep dive, check out our guide on how to baste a quilt, which covers both methods in detail.
The secret to a perfectly flat quilt sandwich is to start in the middle and work your way out. Gently smooth the layers with your hands, pushing any air bubbles or extra fabric toward the edges. Don't stretch the fabric—just smooth it.
Your First Stitches: An Introduction to Machine Quilting
Once your quilt is securely basted, the real fun begins. You don’t need to be a free-motion quilting artist for your first project. In fact, simple, straight-line quilting is not only beginner-friendly but also looks incredibly modern and stylish.
The absolute non-negotiable tool for this is a walking foot. This amazing presser foot has its own set of feed dogs that grip the top layers of your quilt, making sure they move under the needle at the exact same speed as the bottom layers. Without it, you're pretty much guaranteed to get frustrating bunching and puckering.
A fantastic place to start is with "stitching in the ditch." It sounds a bit funny, but it just means quilting directly inside the seam lines of your patchwork. The stitches sink into that little "ditch" and become almost invisible, adding gorgeous texture and securing your quilt without competing with your design. It's a simple technique that delivers a really clean, professional finish.
Tackling Common Quilting Hiccups
Even the most seasoned quilters run into issues, so don't worry if things aren't perfect right away. Most problems are an easy fix.
If your machine starts skipping stitches, the first thing to check is your needle. A dull, bent, or wrong-sized needle is the number one cause. Pop in a fresh one—a 90/14 is a solid, all-purpose choice for quilting through thick layers.
Seeing the fabric bunch up as you sew? That’s a classic sign you either forgot your walking foot or your stitch length is too short. Try lengthening your stitch to around 2.5 or 3.0 mm. This gives the fabric more room to glide through smoothly. With these simple tricks up your sleeve, you’ll be quilting with confidence in no time.
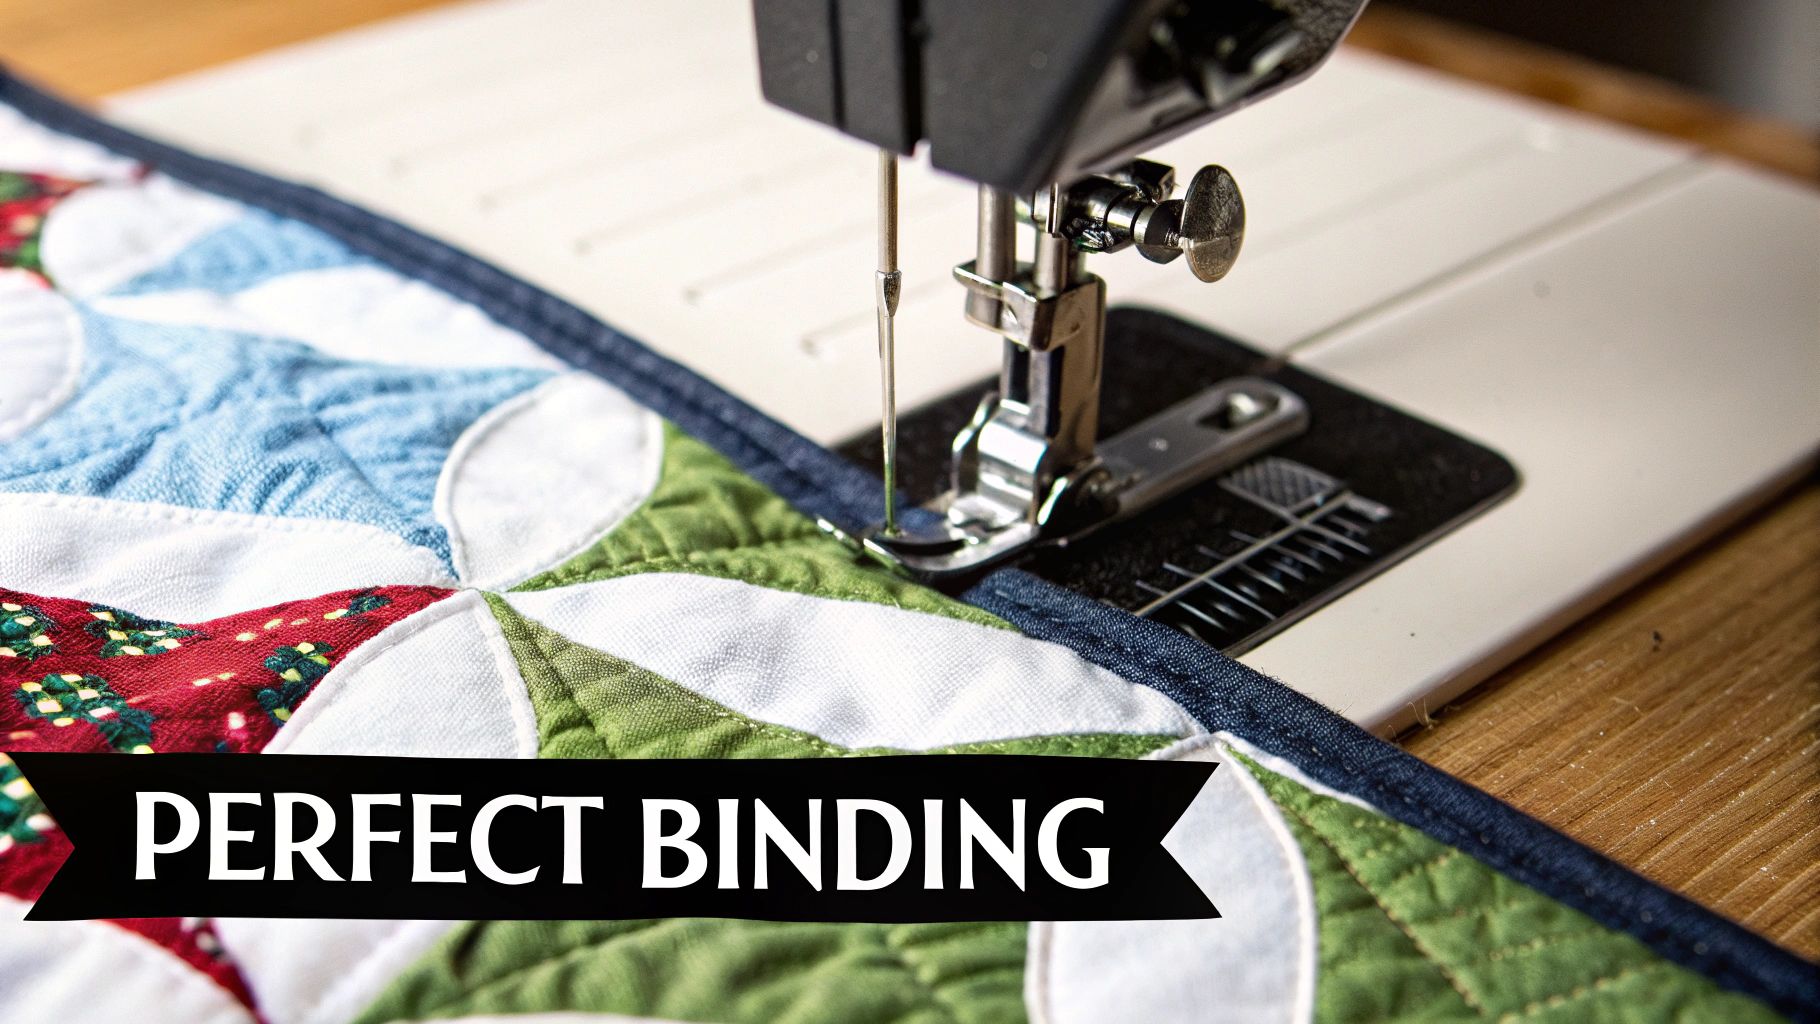
Finishing Your Quilt Like a Pro
The final steps are what turn your hard work from just another project into a cherished heirloom. This is where you add those polished details that give your quilt a durable, professional finish—the little things that make it truly special.
It’s this kind of attention to detail that’s fueling a huge trend toward personalized, artisanal quilts. For beginners, this is fantastic news. It means there's a real appreciation for handcrafted quality, no matter your skill level. You can read more about current quilting industry trends to see how even your first projects are part of a bigger movement.
Before you can add that beautiful finishing frame, you need to square up your quilt. Once all the quilting stitches are in, lay your quilt on a flat surface. Using a long acrylic ruler and a rotary cutter, trim away the excess batting and backing fabric. This simple step creates four perfectly straight edges and crisp 90-degree corners, giving you a clean canvas for the binding.
Creating and Attaching Your Binding
Think of binding as the picture frame for your quilt. It's a strip of fabric that neatly encloses all the raw edges of your quilt sandwich. For your first few quilts, I highly recommend an all-machine method. It's fast, incredibly sturdy, and a great technique to master right from the start.
First, you'll need to figure out how much binding to make. Just measure the perimeter of your quilt (add all four sides together) and then add an extra 10-12 inches. This little bit of extra gives you enough fabric to join the ends and navigate the corners without any stress.
Most quilters, myself included, cut binding strips 2.5 inches wide. You'll cut enough of these strips to meet your total length measurement. The key is to join them together on a diagonal, which helps reduce bulk and creates a smoother, flatter finish.
My favorite trick for joining binding strips is to place two strips right-sides together at a 90-degree angle. Draw a diagonal line from the top left to the bottom right corner, then sew directly on that line. Trim the excess fabric a quarter-inch from your seam, and you'll have a perfect diagonal join.
With your binding strip all pieced together, you're ready to attach it to the quilt. There are a dozen ways to do this, but starting with a secure, all-machine binding will serve you well on countless future projects.
By the way, if you're exploring different techniques, you might be interested in our guide on fusible batting for quilts, which can be a game-changer for certain quilt-as-you-go methods.
The Finishing Touch: A Quilt Label
Last but certainly not least, don't forget to add a label! This is your signature—the story of your quilt, preserved for future generations. It doesn’t need to be fancy. A simple piece of fabric with details handwritten in a permanent pen is absolutely perfect.
Be sure to include a few key things:
- Who made it: Your name.
- Who it was for: The recipient’s name.
- When it was made: The month and year are great.
- Where it was made: Your city and state add a lovely personal touch.
Just sew the label securely onto a corner on the back of your quilt. Years from now, this tiny detail will be a priceless piece of its history.
Got Questions? Let's Talk Quilting.
When you're just starting out, you're going to have a ton of questions. Every new quilter does! Think of these "what if" moments not as problems, but as part of the learning curve. Let's tackle some of the most common hurdles you might face so you can keep quilting with confidence.
One of the first debates you'll run into is whether to wash your fabric before you start. For a beginner, my answer is always a resounding yes, pre-wash your fabric.
Washing first takes care of a couple of potential headaches. It preshrinks the cotton, so your finished quilt won't get all puckered and weird after its first trip through the laundry. It also rinses out any excess dye that could bleed onto your lighter fabrics—a truly gut-wrenching moment you want to avoid.
What's the Best Pattern for a First-Timer?
For your very first quilt, keep it simple. The goal is to get a feel for the two most important skills: cutting fabric accurately and sewing a consistent quarter-inch seam. Once you nail those, the quilting world is your oyster.
- Simple Squares: You can't go wrong with a classic patchwork quilt made of 5-inch squares. Grab a pre-cut "charm pack," and you can skip most of the cutting and get right to the fun part.
- Rail Fence: This pattern is a workhorse for a reason. It's just strips of fabric sewn together, which is perfect practice for mastering those long, straight seams.
I'd steer clear of anything with triangles, curves, or a million tiny pieces for your first go. Master the basics with a project you're genuinely excited about.
A small, simple lap quilt that you actually love and finish is a much bigger win than a huge, complicated project that ends up stuffed in a closet. Choose a pattern that makes you happy!
Why Aren't My Seam Points Matching Up?
Ah, the age-old struggle of mismatched points! It’s the one thing that frustrates new quilters the most, but the fix is usually pretty simple. It almost always comes down to one of three things.
First, check your cutting. Be brutally honest with yourself. Even a tiny error of 1/16th of an inch seems insignificant, but it'll compound across a block and throw everything out of whack.
Next, audit your seam allowance. Is it exactly a quarter-inch, every single time? A quarter-inch presser foot is a game-changer, but even a piece of masking tape on your machine can serve as a reliable guide.
Finally, you need to press, not iron. This is a big one. Don't slide the iron back and forth like you're doing a dress shirt; that will stretch your fabric out of shape. Instead, lift and press the iron straight down. Pressing your seams to one side helps them "nest" together snugly when you join blocks, which is the real secret to getting those perfect points.
At Quilt Batting, we know that what's inside your quilt matters just as much as the top. The right foundation makes all the difference. Explore our collection of premium, bulk-friendly batting rolls and start your next project with confidence by visiting the Quilt Batting shop.