

Making a T-shirt quilt is a beautiful way to preserve memories. I like to think of it in three main stages: preparation, assembly, and finishing. Essentially, you're taking a pile of old shirts, stabilizing the fabric so it’s easy to work with, piecing the blocks together, and then quilting all the layers into a cozy, finished keepsake.
Turn Your T-Shirts Into a Cherished Keepsake
There's something incredibly special about transforming a stack of meaningful T-shirts into a quilt. It’s more than just a sewing project; you’re creating a scrapbook you can wrap up in—full of concerts, teams, travels, and memories. My goal here is to demystify the process for you, offering a clear roadmap from that first cut to the final stitch.
Whether you've made dozens of quilts or this is your very first one, these instructions will give you the confidence to dive in. We’ll cover everything you need to know, from picking the right supplies and prepping your shirts to putting it all together.
This quick visual breaks down the project into its three core phases. It's a great little overview of the journey you're about to take.

As you can see, success really starts with good prep work. If you take your time in the beginning, the assembly will go so much smoother, and you'll end up with a quilt you can be proud of.
Why T-Shirt Quilts Are More Popular Than Ever
It’s no surprise that T-shirt quilts have become so popular. They tap right into our desire for personalized, meaningful projects that give old items a new life. This isn't just a small trend; it's a huge part of why the quilting industry is projected to be a $4.5 billion market in 2025.
With up to 11 million active quilters and 18% of them being newcomers, T-shirt quilts are often the perfect gateway project. They feel less intimidating than a traditional quilt but teach you all the essential skills.
To help you get a sense of the entire project, I've put together a quick overview of the journey ahead.
Your T-Shirt Quilt Project at a Glance
This table breaks down the key stages of making your quilt, offering a high-level overview of the process from start to finish.
| Phase | Key Actions | Essential Tools |
|---|---|---|
| Preparation | Washing shirts, applying stabilizer, creating a template, cutting blocks. | Rotary cutter, mat, fusible interfacing, iron. |
| Assembly | Designing the layout, sewing blocks together, adding sashing/borders. | Sewing machine, quality thread, quilting rulers. |
| Finishing | Layering the quilt top, batting, and backing; quilting; binding. | Batting, backing fabric, safety pins/basting spray, binding clips. |
Seeing it laid out like this helps simplify the process, turning a big project into manageable steps.
Your Path to a Beautiful Quilt
This project is so much more than just the sum of its parts. With a bit of guidance, you're going to create something amazing.
Here’s a glimpse of what you'll accomplish:
- You'll preserve memories. Each block tells a story, bringing moments to life that were just sitting in a drawer.
- You'll build real skills. You’re going to learn fundamental quilting techniques—like how to handle tricky knit fabrics and how to bind a quilt—that you'll use again and again.
- You'll create a functional heirloom. This isn't just for show. You’re making a durable, warm blanket that will be loved for years.
If you’re just starting out, getting these foundational steps right is everything. For a deeper dive into the basics, you might want to check out our detailed guide on quilting tips for beginners. Follow along, and you'll be well on your way to making something truly special.
Getting Your T-Shirts Quilt-Ready
The real secret to a beautiful, long-lasting T-shirt quilt doesn't happen at the sewing machine. It happens right now, during prep. Trust me, taking the time to properly select, wash, and stabilize your shirts is the difference between a frustrating project and a finished quilt you’ll be proud of. This is the foundation, and it's worth getting right.
Before you touch a pair of scissors, let's talk about shirt selection. Lay out all your potential tees and give them a good, honest look. That one with a tiny hole right next to the logo? It might be best to leave it out unless you’re okay with that little imperfection being a permanent part of your finished quilt.
You'll also want to set aside any shirts with chunky plastic details or thick, puffy paint. These are a nightmare to sew through and can wreak havoc on your needle and your patience.
The All-Important First Wash
Once you’ve picked your winners, toss every single shirt into the wash. Even if they look clean, this step pre-shrinks the fabric so your quilt doesn't get all wonky and warped the first time you wash it.
Here's the critical part: wash without any fabric softener or dryer sheets. They leave behind a residue that will fight with the adhesive on your interfacing, causing it to bubble up or peel off later. It's a frustrating problem that's so easy to avoid.
After they're dry, give each shirt a quick pass with a hot iron to get rid of wrinkles. You need a totally smooth surface for the next step, which is where the magic really happens.
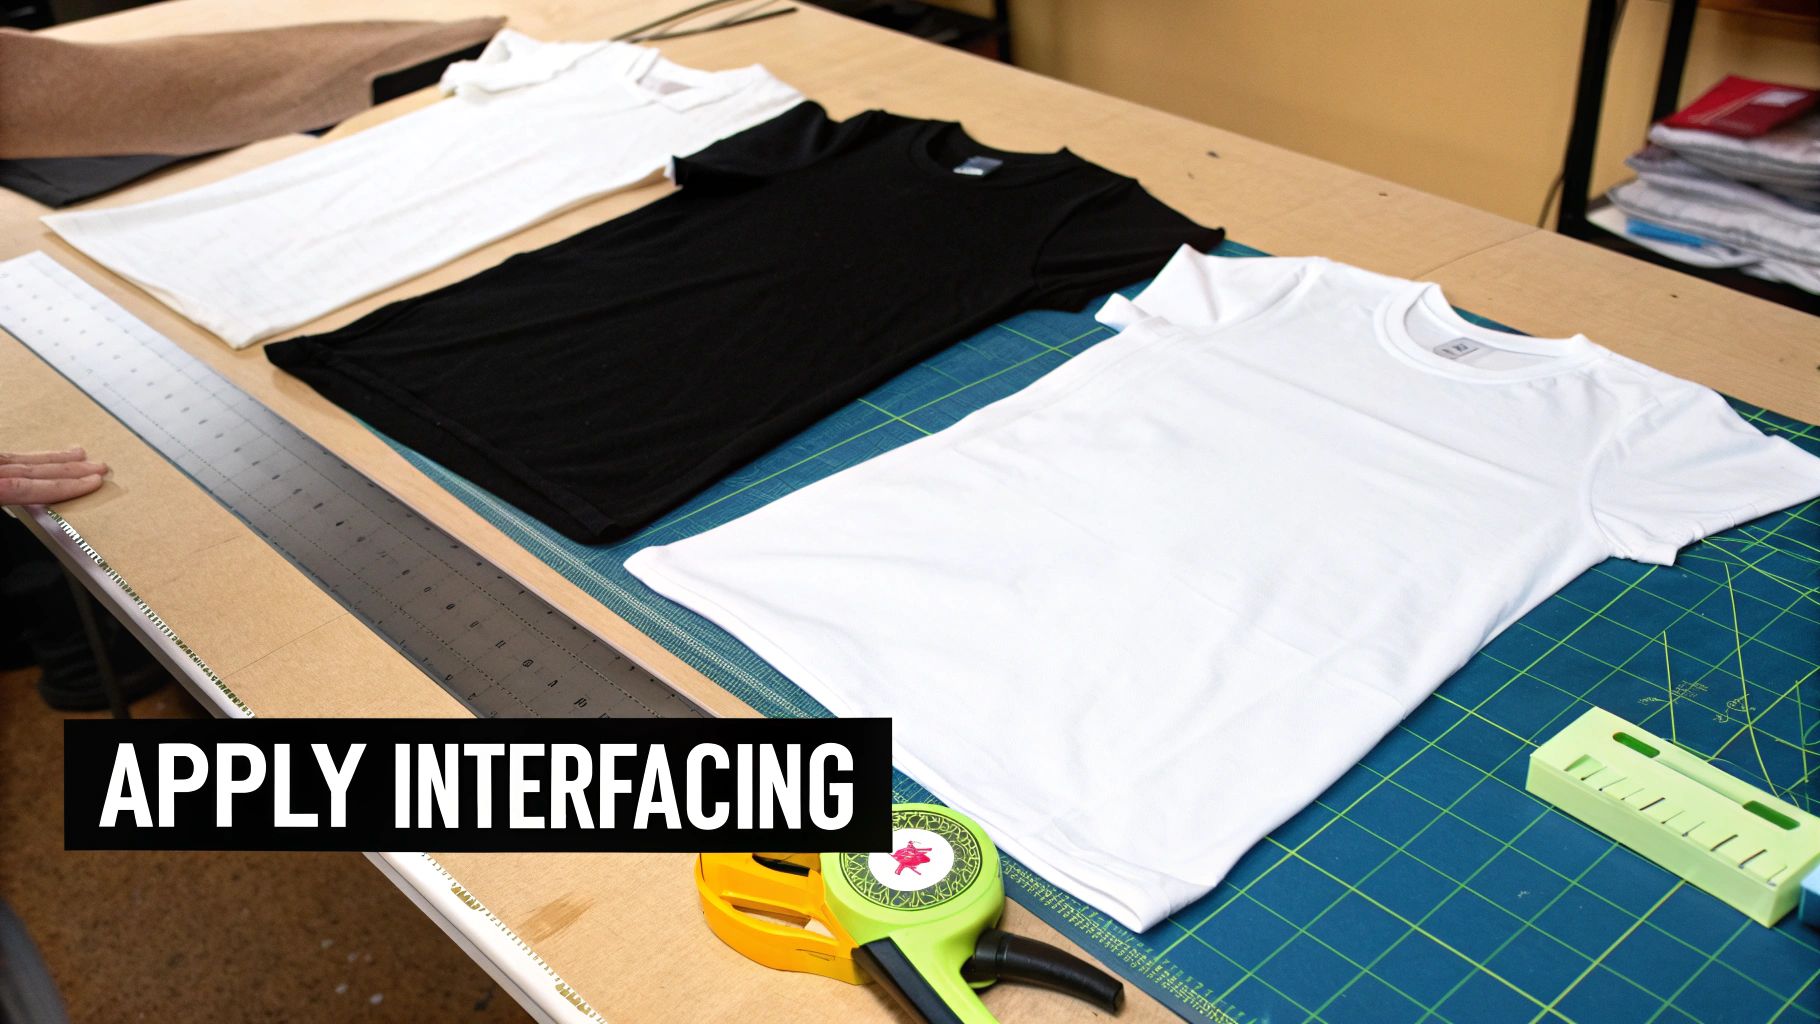
Why Fusible Interfacing Is Your Best Friend
T-shirt fabric is a knit, meaning it's designed to stretch. That's great for comfort, but for quilting, it’s a recipe for disaster. It leads to wavy seams, distorted blocks, and a whole lot of frustration. The solution is applying a lightweight fusible interfacing to the back of every shirt graphic. This is non-negotiable.
Interfacing is a special fabric with a heat-activated glue on one side. When you iron it onto your T-shirt, it stops the stretch completely, making that flimsy knit behave like a stable, predictable piece of cotton.
My Two Cents: I know it's tempting, but whatever you do, don't skip the interfacing to save time. It is the single most important step for guaranteeing a flat, professional-looking quilt. Without it, you’re almost certain to end up with puckers and warped blocks.
If you need a hand picking the right product, our guide on fusible interfacing for quilting breaks down the best options out there.
How to Apply Interfacing Like a Pro
Getting a perfectly smooth, bubble-free bond is easy if you know the technique. Grab your iron, interfacing, and a rotary cutter or sharp scissors.
Follow these steps for a perfect application every time:
- Cut Your Piece: Start by cutting a piece of interfacing that's slightly larger than the T-shirt graphic. This gives you a little wiggle room and ensures the entire design is stabilized.
- Get It in Position: Lay the T-shirt face down on your ironing board. Place the interfacing on the back, with the bumpy, adhesive side touching the fabric.
- Check Your Iron Settings: Set your iron to the temperature recommended by the manufacturer—usually a medium-hot setting with no steam. Steam can mess with the adhesive bond.
- Press, Don't Iron: This is the key takeaway. Instead of sliding the iron around, press down and hold it in one spot for 10-15 seconds. Then lift the iron completely and move it to an overlapping section. Sliding can stretch the fabric and create wrinkles you can't get out.
- Let It Cool Down: After pressing the entire piece, just leave it alone. The adhesive truly sets as it cools, so don't move it until it's cool to the touch.
Cutting Your Blocks with Precision
Now that your shirts are stabilized, they're ready to be cut into perfectly uniform blocks. Taking your time here will make piecing the quilt top infinitely easier.
The best tools for the job are a rotary cutter, a self-healing mat, and a large acrylic quilting ruler. Center your ruler over the graphic, making sure everything is straight and lined up. For example, if you're making 14-inch blocks, you'll want to ensure the design is perfectly centered inside that 14x14-inch square on your ruler before you cut.
Trim all four sides, and you’ve got a perfect block ready to go.
Bringing Your Quilt Top to Life
Now for the fun part! With all your T-shirts prepped and cut, it's time to arrange them into a design that tells a story. This is where your quilt starts to get its personality. Think of it like putting together a mosaic—each piece is a memory, and you're the artist figuring out how they best fit together.
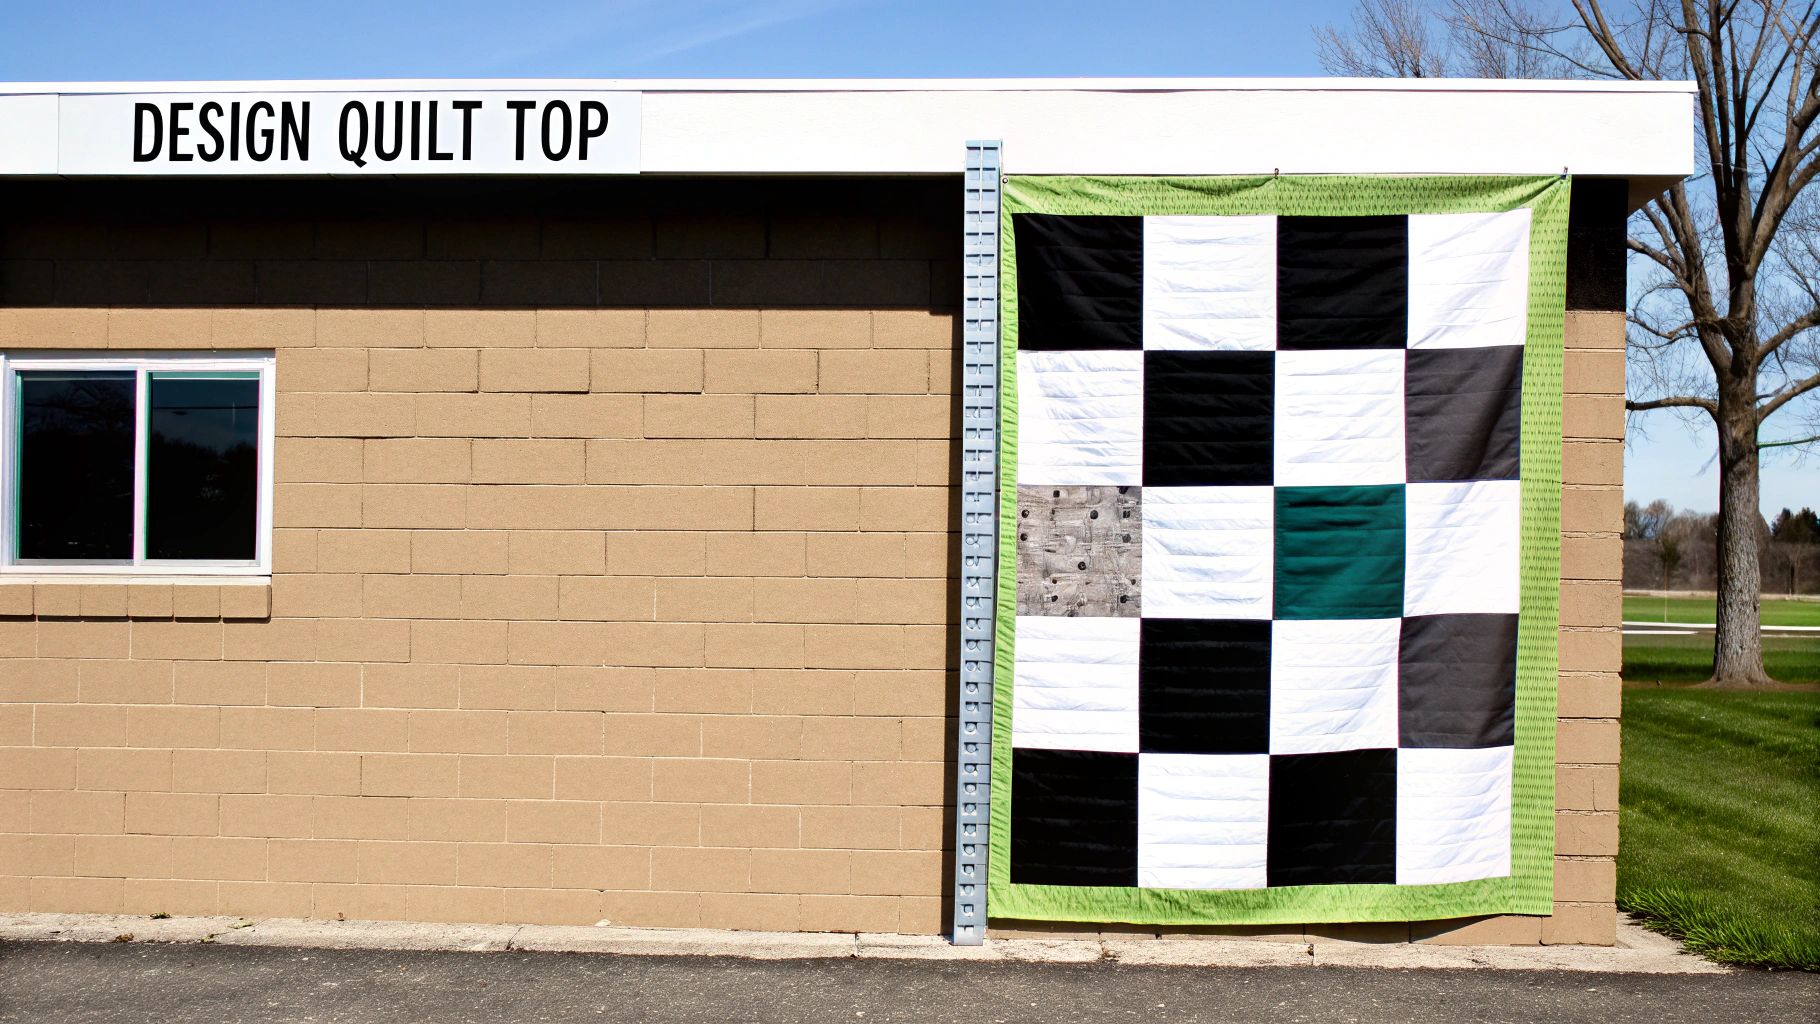
Before you even think about touching your sewing machine, lay everything out. You don't need a fancy design wall; a clean floor or a large bed works perfectly. Spread out all your blocks and just start playing.
Finding a Balanced Layout
The goal here is a design that feels right to you. You want to balance out the colors, themes, and even the "weight" of the graphics so your eyes can move across the quilt without getting stuck in one spot. Try to avoid clumping all the dark shirts in one corner or putting all the text-heavy designs right next to each other.
Here are a few popular strategies to get you started:
- Checkerboard: A timeless classic. Simply alternate your lighter and darker shirts to create a clean, organized look. It's simple, but it always works.
- Color Gradient: This can be stunning. Arrange your blocks to flow from one color to the next, like from blues to greens, creating an ombré effect across the quilt.
- Themed Pockets: Got a bunch of shirts from college? Or from a series of 5Ks? Grouping them together creates little "neighborhoods" of memories within the larger quilt.
Once you land on an arrangement you love, grab your phone and snap a picture. Trust me on this one. It's an absolute lifesaver when you start carrying stacks of blocks to your sewing table and forget which one goes where.
The Great Sashing Debate
Sashing refers to the strips of fabric you can sew between the T-shirt blocks. It's completely optional, but it can really take your quilt to the next level.
Sashing acts like a frame for each T-shirt, making the graphics pop and giving the whole quilt a more polished, traditional look. It's also a great trick for making your quilt bigger if you're a little short on shirts. Adding even a simple 2-inch sashing can make a huge difference in the final size.
If you decide to use sashing, you might also want to add cornerstones—those little squares of fabric that sit where the sashing strips meet. They're a fantastic way to add a pop of accent color and another layer of detail. The process is a bit different from some other quilt-making methods, so if you're curious about different techniques, you might want to look at some quilt as you go patterns for inspiration on block-by-block construction.
Piecing Your Rows with Precision
Okay, it’s time to sew! The secret to a quilt top that lays flat and looks professional is a consistent 1/4-inch seam allowance. Most machines come with a 1/4" foot, but a simple piece of painter's tape on your machine bed also makes a great guide.
The easiest way to assemble your quilt is by sewing the blocks into horizontal rows first. If your layout is five blocks wide, you’ll sew those five together to create one long row. Do this for every row before you even think about joining them.
Pressing as you go is just as important as sewing straight. Here’s a pro tip: press the seams in each row in alternating directions.
- Row 1: Press all your seams to the right.
- Row 2: Press all your seams to the left.
- Row 3: Press them back to the right.
When you do this, your seams will "nest" together perfectly as you join the rows. They lock into place like tiny puzzle pieces, which makes matching up your corners and points almost effortless. Always use a hot, dry iron and press up and down—don't slide the iron back and forth, as that can stretch your fabric out of shape.
Choosing the Perfect Batting for Your Project
Alright, let's talk about what really brings a T-shirt quilt to life: the batting. This is the heart of your quilt, the hidden middle layer that gives it warmth, weight, and that perfect, cozy feel. Picking the right batting isn't just a small detail—it completely changes how your quilt looks, feels, and holds up over the years.
A great batting choice gives your quilt the perfect drape and the durability it needs, especially for a T-shirt quilt that’s going to get a lot of love. You've put so much work into saving and prepping those shirts; you want to make sure the inside is just as good as the outside.
Finding Your Go-To Batting
Stepping into the batting aisle can feel a little overwhelming. You've got cotton, polyester, wool, blends... what's the deal? Let's break down the most popular choices so you can pick the perfect one for your project.
My personal workhorse for most T-shirt quilts is an 80/20 cotton-poly blend. It’s just a fantastic all-around choice. The 80% cotton keeps it soft and breathable, while that 20% polyester adds a bit of strength and helps prevent shrinkage. This blend gives the quilt a lovely, soft drape that feels like it’s been loved for years, right from the first stitch.
Now, if you're aiming for that classic, flatter quilt look, 100% cotton batting is another excellent option. I’d suggest finding one that has a "scrim"—it's a very thin, stable layer bonded to one side of the batting. That little scrim adds a surprising amount of strength, stops the batting from stretching while you're quilting, and even lets you space your stitches a bit farther apart.
Specialty Options Worth Considering
Sometimes, a project just calls for something a little different. Thinking through these specialty options can take your quilt to the next level and, in some cases, make your life a whole lot easier.
- Wool Batting: Looking for incredible warmth and a lofty puff without the weight? Wool is your answer. It's wonderfully breathable, resists creasing, and gives your quilting stitches a beautiful definition that really makes them stand out.
- Black Batting: Is your quilt top made of mostly dark-colored T-shirts? This is one of my favorite pro-tips: use black batting. It guarantees that no little white fibers will poke through your dark fabrics, keeping the top looking crisp and clean.
- Fusible Batting: This stuff is a total game-changer for basting your quilt sandwich. Fusible batting comes with a light, heat-activated adhesive on both sides. You just layer your top, batting, and backing, hit it with an iron, and the layers fuse together. No more safety pins or messy sprays!
My Two Cents: If you're really stuck, grab a few of those small "craft size" batting packages. Make some mini quilt sandwiches and do a little test quilting. There's no better way to see how each type feels and performs before you commit to buying a big roll for your quilt.
For a deeper dive into all the options, I've put together a handy guide on choosing the best batting for T-shirt quilts.
Here's a quick comparison to help you visualize the differences and find the perfect match for your project's needs.
Quilt Batting Comparison Guide
| Batting Type | Best For | Loft | Recommended Quilting Distance |
|---|---|---|---|
| 80/20 Cotton/Poly Blend | Everyday use, soft drape, durability | Low-Medium | Up to 8-10 inches |
| 100% Cotton | Traditional flat look, breathability | Low | Up to 8-10 inches (with scrim) |
| Wool | Exceptional warmth, high loft, stitch definition | High | Up to 4 inches |
| Fusible | Simplifying the basting process, small projects | Low-Medium | Varies by brand |
| Black Batting | Quilts with dark-colored fabrics | Varies | Varies by material |
This table should give you a solid starting point, but remember that the best choice always comes down to the final look and feel you're going for.
Smart Sizing: Why Buying on a Roll Makes Sense
One of the most practical things to consider is the batting width. You can buy it in pre-cut packages sized for standard beds (like twin, queen, etc.) or get it by the roll. While the packages are handy for a one-off project, if you think you'll make more quilts, buying a roll is almost always the more economical choice.
Batting rolls come in standard widths like 96", 108", and even a massive 120". The real magic here is choosing a roll that's wider than your quilt top. Why? It means you don't have to piece your batting together, which saves a ton of time and hassle. For instance, if your finished quilt top measures 80" across, grabbing a 96" roll gives you plenty of extra on all sides without any extra sewing.
For anyone who quilts for others or runs a small business, buying batting by the roll is an absolute must. It's not just about saving money; it's about consistency. Having a trusted, high-quality material on hand for every project ensures you can deliver predictable, beautiful results every single time.
Bringing It All Together: Quilting and Binding
This is the moment of truth. You’ve prepped your shirts, pieced your top, and now it's time to turn those separate layers into an actual, honest-to-goodness quilt. We're about to make the "quilt sandwich," and getting this part right is the secret to a beautifully flat, pucker-free finish.
First things first, clear a big patch of floor space. You'll need more room than you think! Lay your backing fabric down, wrong side facing up, and smooth it out. I like to use painter's tape to tape it down to the floor—pull it taut so it's smooth as glass, but don't stretch the fabric out of shape.
Now, float your batting down on top of the backing, gently smoothing it from the center out. Finally, place your pieced T-shirt top over the batting, right side up. Your goal is a perfectly flat, three-layer stack, with a few inches of extra batting and backing peeking out from all sides of your quilt top.
Creating a Stable Quilt Sandwich
Before you can start quilting, you need to make sure those three layers stay put. This process is called basting, and it prevents everything from shifting around while you work. You've got a few solid options here.
- Pin Basting: The old-school, tried-and-true method. Grab a bag of curved safety pins (they’re so much easier to use than regular ones) and place a pin every 4-6 inches all over the quilt. Always start in the very center and work your way out to the edges.
- Spray Basting: If you're not a fan of pins, basting spray is your friend. It’s a temporary spray adhesive that works like a charm. Just work in small sections—peel back the quilt top, give the batting a light, even spray, and carefully smooth the top back down.
- Fusible Batting: Remember that fusible batting we talked about? If you went that route, your job is easy. Just follow the manufacturer's directions and use your iron to press the layers together.
Deciding How You'll Quilt It
With your sandwich securely basted, you're ready for the magic: the actual quilting. These are the stitches that permanently join the layers and give your quilt its texture and durability. T-shirt quilts are part of a massive handicrafts movement, a market that's projected to grow at an 8.83% compound annual growth rate and hit $1.94 trillion by 2033. To make sure your quilt lasts, you have to quilt it well. You can dive deeper into these textile industry trends to see just how big this creative wave is.
Let's break down the three most common ways to finish your T-shirt quilt.
My Two Cents: No matter which method you pick, the golden rule is to have your quilting lines or ties no more than 4-6 inches apart from each other. Any farther, and the batting can start to shift and bunch up inside the quilt, especially after a few washes.
Method 1: The Charm of Tie Quilting
Tying is a fantastic starting point. It's quick, forgiving for beginners, and gives the quilt a cozy, handmade feel that’s just perfect for a T-shirt project.
You'll need a strong thread—think embroidery floss or perle cotton—and a needle with a large eye. At the corner of each T-shirt block, just poke the needle down through all three layers and back up again. Tie a tight little square knot on top, snip the tails to about an inch long, and move on to the next one. It’s that simple!
Method 2: Quilting on Your Home Machine
This is probably the most popular route, and it's totally doable on a standard sewing machine. The absolute non-negotiable tool for this is a walking foot. This foot has feed dogs built into it, so it pulls the top layer of fabric through at the same speed as the machine’s feed dogs pull the bottom layer. It is your single best defense against puckers and shifting.
You can do simple straight lines right in the seams (we call this "stitching in the ditch") or quilt a simple grid across the whole surface. If you’re feeling bold, you can even swap to a darning foot and try your hand at some basic free-motion quilting.
Method 3: Going Pro with a Longarm
For a truly professional, polished look, longarm quilting is the way to go. You can either find a local quilt shop that rents time on a longarm machine or hire a professional to do it for you. A longarmer can stitch a beautiful all-over pattern (called a pantograph) or do custom work that outlines and enhances the design on each shirt. It’s the fastest and slickest way to finish your project.
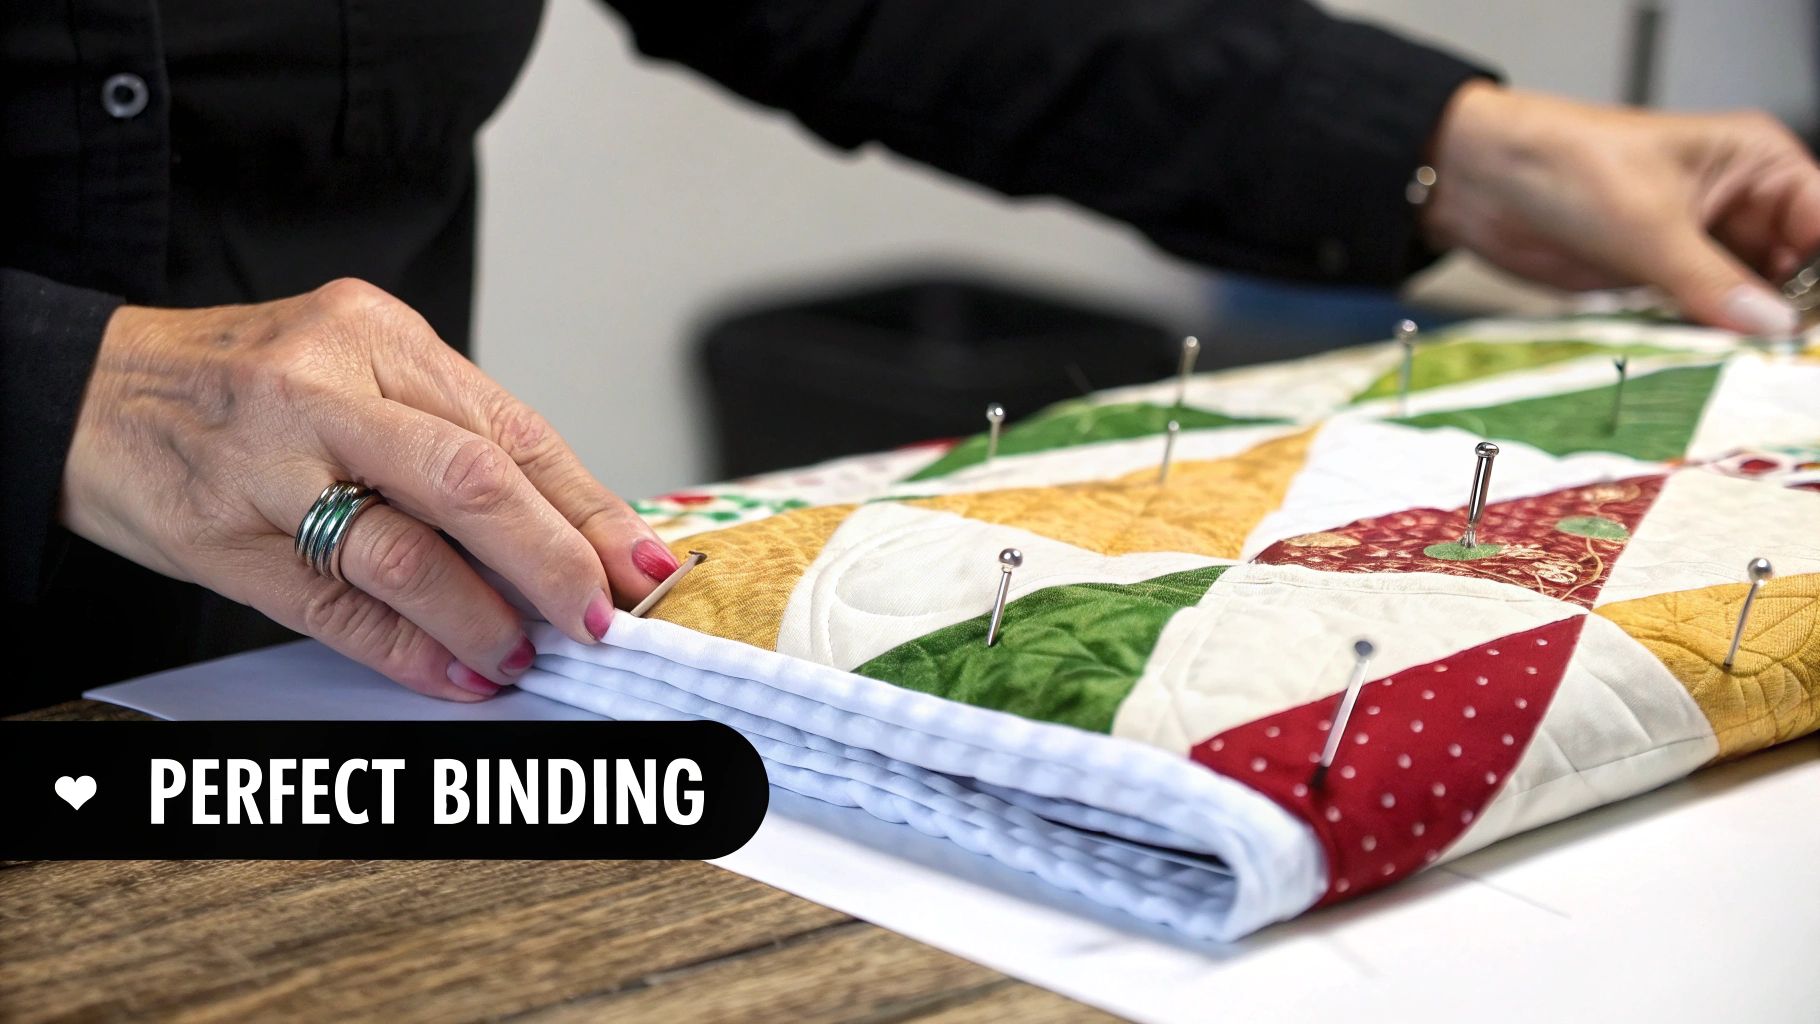
Adding That Flawless Final Frame: The Binding
We're in the home stretch! The binding is that final fabric border that wraps around the raw edges of your quilt, giving it a clean, durable, and professional finish.
First, take a deep breath and trim away all the extra batting and backing so the edges are perfectly flush with your quilt top. Now, to make the binding itself, cut enough 2.5-inch wide strips of fabric to circle the entire quilt. You'll sew these strips together end-to-end with a diagonal seam, which helps distribute the bulk for a flatter finish.
Fold that super-long strip in half lengthwise (wrong sides together) and give it a good press. Starting somewhere in the middle of one side, line up the raw edges of your binding with the raw edge of the quilt. Sew it down with a 1/4-inch seam allowance. When you get 1/4 inch from a corner, stop, fold the binding up and away from the quilt, and then fold it back down along the next side to create a neat mitered corner. Continue sewing.
Once you’ve sewn the binding all the way around the front, it's time to wrap it around to the back. Use binding clips to hold it in place and hand-stitch it down with a blind stitch for that classic, invisible finish. This final, careful step is what elevates your project from a blanket to a true quilt.
Got Questions? I've Got Answers
As you dive into making your first T-shirt quilt, a few questions are bound to pop up. It happens to everyone! I’ve gathered some of the most common ones I hear from quilters, along with my best advice to help you keep moving forward with confidence.
How Many T-Shirts Do I Really Need?
This is the big one, isn't it? The honest answer is: it depends. The size of your quilt and the size of your blocks will dictate the final count. There's no single magic number, but we can definitely figure out a solid estimate.
For a good-sized throw quilt, something around 60x72 inches, you'll probably need about 20 to 25 shirts if you're using 14-inch finished blocks. If you're dreaming bigger, like a queen-size quilt, you could be looking at anywhere from 35 to 45 shirts.
My best advice? Plan your layout before you make a single cut. Decide on your final quilt dimensions, figure out how many blocks it'll take to fill that space, and then see how your T-shirt pile stacks up.
It’s always a good idea to have a few extra shirts on hand just in case. But if you find you're a little short, don't panic! You have a couple of great options:
- Add filler blocks. Grab a few blank T-shirts in coordinating colors and cut some blocks from those. This can give the eye a place to rest and really make your graphic tees pop.
- Bring in sashing. Sewing strips of fabric between your blocks is a classic quilting technique for a reason. It's a fantastic way to increase the quilt's overall size while beautifully framing each and every shirt.
Can I Mix in Sweatshirts or Jerseys?
Absolutely! In fact, mixing in different types of shirts is a great way to add texture and tell a richer story. The only thing you need to do is adjust how you prep each type of fabric.
Sweatshirts are thick and much more stable than your average T-shirt, so you can often get away with a very lightweight interfacing—or sometimes none at all. I always recommend testing a small corner first to see how it behaves.
Jerseys, on the other hand, especially the ones with that classic mesh or open weave, are a different story. You absolutely must use a lightweight fusible interfacing on the back. This is non-negotiable. It stabilizes the fabric so it won't stretch, warp, or pucker while you're sewing.
When you start piecing these different fabric weights together, a fresh ballpoint or stretch needle will be your best friend. Just sew slowly and let the machine do the work.
A Quick Tip: If you're sewing a heavy sweatshirt block right next to a standard T-shirt block, a walking foot is worth its weight in gold. It makes sure both layers feed through the machine at the exact same rate, which is the secret to a perfectly flat seam.
Why Is My Quilt Top Wavy Instead of Flat?
Oh, the dreaded wavy quilt top. It’s one of the most common frustrations for new quilters, but I promise, it's almost always preventable. The culprit? Uncontrolled stretch.
This is precisely why stabilizing every single T-shirt block with fusible interfacing is the most important step in the whole process. If you skipped it, that's almost certainly why your quilt top isn't lying flat.
A few other things can contribute to the problem, though:
- Inconsistent Seams: If your seam allowances wander from a perfect 1/4 inch, your blocks won't fit together properly, causing pulling and distortion.
- Scrubbing with the Iron: Are you pressing or ironing? Sliding your iron back and forth is a surefire way to stretch the fabric. Always press by lifting the iron straight up and placing it back down.
- Stretching While Sewing: It's so tempting to push or pull the fabric through the machine, but you have to let the feed dogs do their job. Guiding the fabric is all that's needed.
A walking foot is your best defense against this, as it guarantees both the top and bottom layers feed evenly. If the damage is already done, some careful pressing with steam can sometimes help relax the waves, but preventing the stretch from the get-go is the winning strategy in your how to t shirt quilt instructions.
What’s the Best Way to Care for My Finished Quilt?
You've poured so much time and love into this project, so let's make sure it lasts a lifetime! The good news is that proper care is pretty simple.
When it's time for a wash, use a gentle cycle with cold water and a mild detergent. For a little extra protection, you can pop the quilt inside a large, zippered duvet cover before tossing it in the machine. This helps minimize stress on the seams.
When it comes to drying, low and slow is the way to go. Tumble dry on the lowest heat setting your dryer has. Even better, let it air dry by laying it flat over a clean surface or a few drying racks. High heat is the enemy; it can crack and damage the screen-printed graphics and might even shrink certain types of batting.
Creating a T-shirt quilt is a journey, and having the right supplies can make all the difference. For consistent, high-quality results, Quilt Batting offers premium batting by the roll, perfect for ensuring every project has the heart it deserves. Explore our selection of Hobbs and Pellon products at https://quiltbatting.shop.