

Getting the quilt batting size right is the secret handshake of quilting. It’s one of those foundational steps that separates a good quilt from a great one. The golden rule, and trust me on this, is to make sure your batting is always at least 8 inches wider and 8 inches longer than your quilt top.
This extra fabric isn't just for show; it's your safety net. It gives you the wiggle room you need for quilting, trimming, and dealing with any potential shrinkage. Think of it as your insurance policy for a perfect, pucker-free finish.
Your Go-To Quilt Batting Size Chart
Choosing the right batting size can feel a bit nerve-wracking, but it really doesn't need to be. The most common hiccup I see is quilters buying batting that’s the exact same size as their quilt top. It’s an easy mistake to make, but it leaves zero margin for error.
When the batting is too small, you risk it pulling away from the edges while you’re quilting. Worse, it can end up too short after its first wash. To take all the guesswork out of the equation, I've put together this handy reference guide.
Standard Quilt and Batting Size Recommendations
Here’s a simple chart that lays out the standard measurements for common quilt sizes, from a tiny crib quilt to a massive California King. Each recommendation already includes that essential buffer, ensuring you have plenty of room to work your magic, whether you're quilting at home or sending it to a longarmer.
| Quilt Size Name | Approximate Quilt Top Size (Inches) | Recommended Batting Size (Inches) |
|---|---|---|
| Crib | 36" x 52" | 44" x 60" |
| Throw | 50" x 65" | 58" x 73" |
| Twin | 70" x 90" | 78" x 98" |
| Double / Full | 85" x 108" | 93" x 116" |
| Queen | 90" x 108" | 98" x 116" |
| King | 110" x 108" | 120" x 116" |
| California King | 104" x 112" | 112" x 120" |
This chart is a great starting point, but always remember to measure your own quilt top before buying. A few extra inches here or there can make all the difference.
Key Takeaway: Always add a minimum of 4 inches to each of the four sides of your quilt top when sizing your batting. This gives you that crucial 8-inch total buffer for both the width and the length.
Now that you've got the sizing down, you can focus on the fun part—choosing the perfect material for that cozy middle layer. To explore how different fibers and blends will affect your final quilt, head over to our detailed https://quiltbatting.shop/blogs/blog/quilt-batting-comparison-chart. It's the perfect resource for finding the right batting for your next masterpiece.
Why You Need More Batting Than You Think
It’s a classic rookie mistake, and one that trips up even seasoned quilters from time to time: buying a piece of batting that’s the exact same size as your quilt top. Logically, it seems to make sense. If your quilt top measures 50" x 65", then a 50" x 65" piece of batting should be the perfect fit, right? Unfortunately, that seemingly simple math is a fast track to quilting frustration.
Think of your quilt as a three-layer sandwich. It's not truly a quilt until all those layers are stitched together, and that very process changes everything. Whether you're quilting on a longarm or your home machine, you absolutely need extra batting around all four sides to handle two crucial things: the quilting process itself and the inevitable shrinkage.
The Quilting Allowance: Your Safety Net
Ever stretched a canvas over a frame? You need that extra bit of material to pull, wrap, and secure it. Quilt batting is no different. As the needle and thread work their way through the quilt top, batting, and backing, they pull the layers together, causing them to draw inward.
In the quilting world, we call this "draw-up" or "take-up." The more intricate your quilting design, the more significant this effect becomes, eating up that batting around the edges.
Expert Tip: A good rule of thumb is to have at least 4 inches of extra batting on every side. That means your batting should be 8 inches wider and 8 inches longer than your quilt top. This gives you the breathing room you need.
This buffer is non-negotiable. It ensures that as the layers pull in, the batting doesn't disappear under the edge of your quilt top, leaving your corners unprotected and uneven. For longarmers, this extra material is also what they clamp to their machine's frame to keep the tension perfect from edge to edge.
Preparing for Post-Wash Shrinkage
The second reason for going bigger is something many quilters forget until it's too late: shrinkage. Most batting, especially natural fibers like cotton, wool, and bamboo, is designed to shrink a little in that first wash. This isn't a flaw—it's what creates that classic, crinkly, well-loved texture we all adore.
For instance, 100% cotton batting can shrink up to 3-5%, which can make a huge difference in your final project.
Here’s why planning for that shrinkage is so important:
- It Prevents Puckering: If your batting shrinks more than your fabric, you’ll end up with weird puckers and a distorted quilt. You want the whole sandwich to shrink together harmoniously.
- It Maintains the Final Size: A 5% shrink on a queen-sized quilt could mean losing over 4 inches of width! If you don't account for that, the quilt won't fit the bed it was made for.
- It Creates a Professional Finish: That gentle, all-over crinkle is a sign of a beautifully finished quilt. By giving it room to shrink, you get that lovely texture instead of a lumpy, uneven mess.
Starting with a larger piece of batting from the get-go is the secret. It allows you to accommodate both the mechanical pull of quilting and the natural transformation that happens in the wash. This bit of foresight is what guarantees your finished quilt will be square, beautifully textured, and precisely the size you intended.
Choosing the Right Batting Roll for Your Studio
For anyone who quilts seriously—whether you're a passionate home quilter, run a longarm studio, or own a quilt shop—how you buy batting becomes a real strategic decision. Making the leap to buying by the roll is hands-down the best way to cut costs, slash waste, and make sure you’re never caught without the right quilt batting size. It's the end of last-minute trips to the fabric store and trying to make do with pre-packaged batting that’s just a little too small.
Investing in a roll of batting is like buying flour or sugar in bulk from a restaurant supply store. It's just plain smarter—more economical and way more efficient. Instead of wrestling with a pre-cut package that might not be quite right for a custom quilt, a roll gives you the freedom to cut exactly what you need, every single time. This is especially true if you’re a longarmer, where having consistent, high-quality material on hand is non-negotiable for getting those professional, client-pleasing results.
Understanding Batting Roll Widths
The single most important feature of a batting roll is its width. This measurement dictates the largest quilt you can finish without having to piece batting scraps together—a time-consuming and often frustrating task. The standard widths you’ll see are designed to perfectly accommodate common bed sizes, leaving you with just the right amount of overage for quilting.
Here’s a quick rundown of the most popular roll widths and what they’re best for:
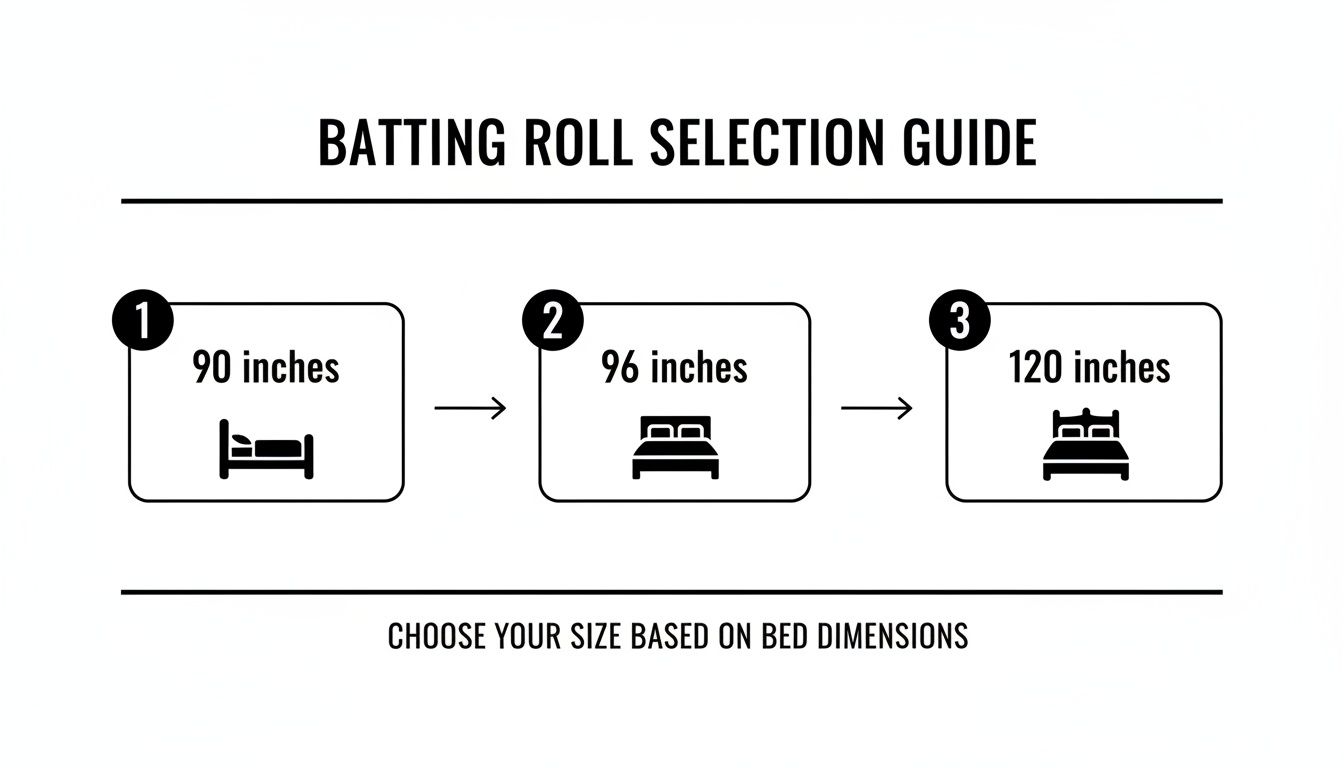
- 90" or 96" Width: Think of this as the workhorse for most quilters. It’s perfect for everything from a generously-sized throw all the way up to a Twin or Full/Double bed quilt, with no seams needed. A 96-inch roll is incredibly versatile and will cover the vast majority of projects that come through a home studio.
- 108" or 120" Width: When you’re ready to tackle the big stuff like Queen and King size quilts, these wider rolls are essential. A 120-inch roll is an absolute game-changer, letting you load a massive quilt top onto a longarm frame with plenty of buffer on every side. It’s the secret to a flawless, edge-to-edge finish.
Pro Tip: When you're on the fence, it's almost always a better bet to go with the wider roll. You can easily cut down a 120" piece for a baby quilt, but you can't stretch a 90" roll to fit a California King without piecing it.
This need for versatility is a huge reason the global quilt batting market has seen such impressive growth. For businesses, offering premium rolls in widths like 96", 108", and 120" taps right into this demand. Longarmers and quilt shops depend on these bulk options to serve the estimated 20 million quilters in the U.S. alone.
Choosing The Right Batting Roll Width For Your Quilt
Picking the perfect roll really comes down to matching the width to the kinds of quilts you make most often. If you specialize in adorable baby quilts, your needs are going to be completely different from a longarm studio that regularly finishes king-sized heirlooms.
This table breaks it down, showing you exactly how a roll’s width impacts what you can create.
| Batting Roll Width | Ideal For Quilt Sizes Up To | Best For These Projects |
|---|---|---|
| 90-Inch | Twin Size (78" wide) | Baby Quilts, Lap Quilts, Throws, Twin Quilts |
| 96-Inch | Full/Double Size (93" wide) | Most Throws, Twin, and Full/Double Quilts |
| 120-Inch | King Size (120" wide) | Queen, King, and California King Quilts |
As you can see, a 120" roll gives you the ultimate flexibility to say "yes" to any project, while a 96" roll is a fantastic, cost-effective choice that covers a huge range of popular quilt sizes.
How Much Batting Is on a Roll
Once you’ve settled on a width, the next thing to consider is length. Batting rolls are sold by the yard, and the common lengths provide a serious amount of material for busy quilters.
- 15-Yard Rolls (or Boards): This is a great starting point for the serious hobbyist. You get enough batting to complete several quilts without having to figure out where to store a massive, full-sized roll.
- 30- to 40-Yard Rolls: This is the industry standard for professional longarm studios and quilt shops. To put it in perspective, a 30-yard roll of 120" wide batting is enough to finish about nine king-sized quilts. That’s a ton of efficiency packed into one purchase.
Making the switch to buying by the roll is a huge step in taking your quilting more seriously, whether it's your passion or your profession. It saves you money, cuts down on stress, and gives you the confidence to tackle any project that comes your way. To see what’s out there, check out our guide on high-quality cotton batting rolls. It’s a great resource for finding the perfect match for your studio’s needs.
How to Figure Out Exactly How Much Batting You Need
Alright, let's get down to the brass tacks. Moving from a finished quilt top to a finished quilt means getting the batting just right. This isn't a place for guesswork; you need a simple, reliable way to calculate your quilt batting size so you never come up short. Trust me, there's nothing more frustrating than realizing your batting is too small after you've already started quilting.
The secret is to give yourself a generous safety net around your entire quilt. This extra bit of batting—what we call an "overage" or "buffer"—is your insurance policy. It accounts for the way fabric pulls in during quilting and for any shrinkage that might happen in that first wash, giving you plenty of room to trim everything up for a perfectly square, professional finish.
The Foolproof Batting Formula
At its core, the math is just simple addition. All you need are the width and length of your finished quilt top.
Here’s the only formula you need to remember:
- Quilt Top Width + 8 Inches = Your Batting Width
- Quilt Top Length + 8 Inches = Your Batting Length
That’s it! This simple calculation gives you a 4-inch buffer on all four sides of your quilt. This is the gold standard for both home quilters and longarm professionals because it guarantees you have enough wiggle room for quilting, squaring up, and binding without any stress.
Let's see how this works with a couple of common quilt sizes.
Example 1: A Cozy Throw Quilt
You've just finished piecing a beautiful throw quilt top that measures 50 inches wide by 65 inches long.
- Width: 50" + 8" = 58"
- Length: 65" + 8" = 73"
- Your Batting Size: You need a piece of batting that is at least 58" x 73".
Example 2: A Queen-Sized Quilt
Now for something bigger. Your queen-sized quilt top measures 90 inches wide by 108 inches long.
- Width: 90" + 8" = 98"
- Length: 108" + 8" = 116"
- Your Batting Size: For this project, you'll need a piece of batting that’s a minimum of 98" x 116".
Always, always, always measure your actual quilt top before you buy batting. Standard bed sizes are great starting points, but your unique pattern or piecing style might result in slightly different dimensions. A quick measure is the key to getting it right.
From Inches to Yards on a Roll
Okay, so you know the dimensions you need. But how does that translate to buying batting off a roll at the shop? This is where you turn your required inches into the linear yards you need to ask for.
Let's stick with our queen quilt example. We need a piece of batting that's 98" x 116". At the store, you see rolls that are 96" wide and 108" wide. The 96" roll is too narrow—it won't cover your 98" width requirement. So, the 108-inch roll is the perfect choice.
Since the roll is already wider than you need, you only have to worry about the length. Your required length is 116 inches. To figure out how many yards that is, you just divide by 36 (because there are 36 inches in a yard).
- 116 inches ÷ 36 inches/yard = 3.22 yards
To play it safe and make cutting easier for the shop, you'd ask for 3.25 yards of the 108" wide batting. If you want to dive deeper into all the options, we have a whole guide on buying quilt batting by the yard.
This little guide can help you visualize which roll width makes the most sense for different bed sizes, helping you work smarter, not harder.
Choosing a roll width that easily covers your quilt's dimensions is the best way to minimize waste and, more importantly, avoid having to piece batting scraps together.
Matching Batting Material to Your Project

Getting the quilt batting size right is a huge win, but it’s only half the story. The material you choose for that cozy middle layer is just as crucial. It dictates everything from the quilt's drape and warmth to how it behaves under the needle. Think of it like picking tires for a car—the size must be correct, but the type of tire determines the ride.
Matching the batting fiber to your project’s purpose is how you bring your creative vision to life. A delicate wall hanging simply has different needs than a heavy-duty bed quilt meant to endure countless washes and cozy nights. Let’s walk through the most popular options so you can pick the perfect one.
The All-Around Performer: 80/20 Cotton-Poly Blend
For most quilters, the 80/20 cotton-polyester blend is the trusty, do-it-all choice. This batting strikes a perfect balance, giving you the soft, natural feel of cotton along with the strength and stability of polyester. The result is a batting that drapes beautifully, has minimal shrinkage, and handles machine quilting like a dream.
It’s the ideal batting for quilts that will see a lot of love, like everyday bed quilts and family-room throws. It offers just enough loft to define your quilting stitches without feeling bulky, making it a fantastic and reliable workhorse for a huge range of projects.
The Machine Quilter’s Best Friend: 100% Cotton with Scrim
If your quilt features an intricate machine-quilted design, you can’t beat 100% cotton with a scrim. So, what’s a scrim? It’s a very thin, lightweight stabilizer that's needle-punched into the cotton fibers.
This little addition acts like a hidden web of support, preventing the batting from stretching, shifting, or tearing under the stress of a sewing machine. It makes the batting significantly stronger and more stable.
The real magic of a scrim is that it lets you place your quilting stitches much farther apart—sometimes as far as 8 to 10 inches—without the batting separating. This gives you incredible creative freedom for both simple, modern designs and complex, detailed patterns.
Specialty Battings for Unique Projects
Beyond the everyday staples, a whole world of specialty battings can take your quilts from beautiful to breathtaking. Each one offers unique properties designed for specific needs, giving you a perfect finish every time. For a deeper dive, you can explore our guide on the different types of quilt batting.
Here are a few popular specialty options:
- Wool Batting: Need exceptional warmth without the weight? Wool is your champion. It has a magnificent, springy loft that makes quilting stitches pop and is naturally resistant to creases.
- Black Batting: When you’re working with dark or richly colored fabrics, white batting can sometimes peek through your needle holes—a frustrating problem called "bearding." Black batting, available in polyester or a cotton/poly blend, is dyed to blend seamlessly, keeping your dark quilt top flawless.
- Fusible Batting: This is a fantastic time-saver, especially for smaller projects like table runners and placemats. A heat-activated adhesive on both sides lets you iron the quilt sandwich together, completely eliminating the need for pinning or spray basting.
It’s interesting to think that the wide variety of batting we have today really took off after WWII, thanks to the rise of home sewing machines. This boom empowered quilters to tackle larger queen and king-sized projects, which today account for over 55% of all batting sold. This growth helped turn brands like Hobbs and Pellon into household names, and they now command about 60% of premium batting sales.
Common Batting Mistakes (And How to Skip Them Entirely)
We’ve all been there. Even after making dozens of quilts, it's easy to make a simple miscalculation with batting. One wrong move can turn a project you love into a frustrating ordeal. But don't worry—most of these common slip-ups are completely avoidable once you know what to watch out for.
The biggest mistake I see? Buying batting that's the exact size of the quilt top. It seems logical, right? Wrong. This leaves you with zero margin for error. As you quilt, the layers naturally pull inward, and without that crucial extra buffer, your batting will recede from the edges. You’ll end up with thin, flimsy corners and an uneven finish.
The golden rule is simple: always add at least 8 inches to both the length and width of your quilt top measurement. That gives you a comfortable 4-inch safety net on all four sides.
Forgetting About Shrinkage and Loft
Another classic oversight is not planning for shrinkage. It's a natural part of the process, especially with fibers like cotton and wool. That gentle puckering after the first wash is what gives a quilt that wonderful, crinkly, well-loved look. But if your batting shrinks a lot more than your fabric, you'll get a distorted mess. Always check the packaging for the shrinkage rate and factor it in.
The loft—or thickness—of your batting is just as important. It’s no surprise that mid-range lofts make up about 50% of the global market; they’re incredibly versatile. And within that, a whopping 70% is used by home quilters just like us. A super-puffy, high-loft batting will fight you every step of the way on a project with dense, detailed stitching. On the flip side, a thin, low-loft batting won’t give you that plush, cuddly feel you want for a bed quilt. You can learn more about these quilt batting industry trends if you're curious.
Picking the Wrong Roll Width
For anyone buying batting by the roll, choosing the wrong width is a painful and expensive error. You'll be stuck piecing batting together, which is a tedious job that can create lumpy, visible seams inside your beautiful quilt. A little planning goes a long way here.
How to Sidestep the Top 3 Batting Blunders
The Mistake: Forgetting the buffer and buying batting cut to your quilt top's exact size.
The Fix: Always add 8 inches to your quilt top's length and width. This gives you a 4-inch buffer on every side for quilting and squaring up.
The Mistake: Ignoring how the material behaves—specifically its shrinkage rate and loft.
The Fix: Read the product details! Match the loft to how you want the quilt to feel and function, and be prepared for any potential shrinkage.
The Mistake: Ordering a roll width that’s too narrow for your go-to projects.
The Fix: Look at the quilts you make most often. Longarm studios, for example, almost always have a 120" roll on hand. It lets them handle king-sized quilts with ease and can reduce their waste by up to 20% per project.
Thinking through these potential issues beforehand makes the whole process smoother and way more enjoyable. Trust me, a little foresight will save you a world of headaches and help you create a quilt you're truly proud of.
Got Batting Questions? We've Got Answers.
Even after you've done the math and checked the charts, a few nagging questions about batting can still crop up. Trust me, we’ve all been there. Getting a handle on these common queries is a huge confidence booster and helps make sure your project goes off without a hitch.
Think of this as your go-to cheat sheet for all things batting.
How Much Extra Batting Do I Really Need?
The golden rule I always stick to is adding 8 extra inches to both the length and width of your quilt top. That gives you a solid 4-inch safety net on all four sides.
This isn’t just about being cautious; that extra space is your best friend. It accounts for a few critical things:
- Quilting Draw-Up: As you quilt, the stitches pull the layers together, and your quilt naturally shrinks a bit. This buffer prevents your batting from ending up too short.
- Longarm Loading: If you’re sending your quilt to a longarmer, they need that extra material to clamp everything securely onto their frame. Don't skimp here!
- Trimming and Squaring Up: After quilting, you need room to trim everything down for those perfectly crisp, square edges we all love.
A Quilter's Wisdom: Fight the urge to cut your batting to the exact size of your quilt top. I know it feels wasteful, but that 8-inch buffer is the best insurance policy you can buy for your quilt.
Is It Okay to Piece Together Batting Scraps?
Absolutely! In fact, it's one of the smartest things you can do. Piecing batting scraps is a wonderful way to save money and cut down on waste, especially when you have all those trimmings left over from bigger quilts.
The trick is to do it right. First, trim the edges of your scraps so they're perfectly straight. Then, just butt the clean edges up against each other—don't overlap them. You can use a wide zigzag stitch on your sewing machine or a fusible batting seam tape to join them. This creates a nearly invisible seam that won’t leave a lumpy ridge inside your finished quilt.
Should I Pre-Wash My Quilt Batting?
This one really comes down to personal preference and the look you're going for. If you're using 100% cotton batting and want a flat, modern finish, then yes, pre-washing is a great idea. It gets most of the shrinkage out of the way before you start quilting.
On the other hand, many quilters (myself included!) love that classic, crinkly, vintage look. To get that effect, you deliberately don't pre-wash the cotton. When you wash the finished quilt, the top and the batting shrink up together, creating that wonderfully puckered texture.
Just be sure to check the manufacturer's instructions on the package. Materials like polyester and wool have their own set of rules.
What's the Best Way to Buy Batting for Multiple Projects?
If you find yourself making more than a couple of quilts a year, buying batting by the roll is a total game-changer. It's hands-down the most cost-effective way to go.
Grabbing a 30-yard roll in a versatile width like 96" or 108" brings your cost-per-quilt way down compared to buying those pre-cut packages. Plus, you have the freedom to cut exactly what you need for any project, which means a whole lot less waste in the long run.
Ready to stop guessing and start quilting with confidence? At Quilt Batting, we offer premium batting rolls in the widths and materials you need to get professional results every time. Explore our collection and find the perfect foundation for your next masterpiece at https://quiltbatting.shop.